Making a minimalist canal-city hydrology print with the River Network Map preset
Difficulty: Easy. Time: under an hour of design time, then your printer's run. Best method: full-colour print (it's a flat, blues-on-white hydrology design). A laser version cuts beautifully from blue acrylic as a single water shape.
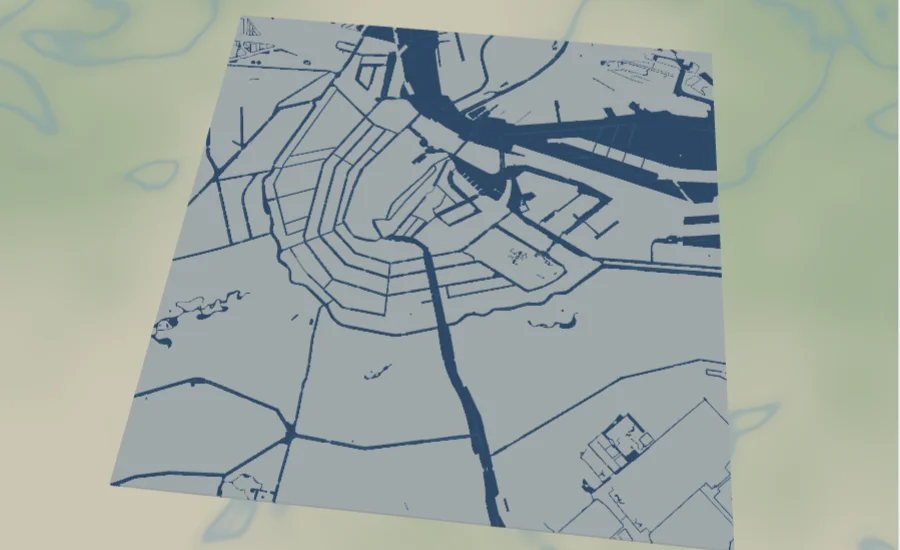
This is a hydrology-first preset with a minimalist soul. The River Network Map draws nothing but water - Amsterdam's canals, docks, rivers and streams in deep and pale blues on a near-white base. There are no roads, no parks, no labels: just the water network. Because the city is never drawn, it appears anyway in the negative space between the canals, which is exactly the point. Striking minimalist hydrology art.
Amsterdam is the perfect subject: its concentric rings of canals form a famously elegant fan of curves, and with everything else removed those curves carry the whole frame. The result reads as both a map and a piece of abstract water art.
What You'll Need
UV print / sublimation
- The exported high-res PNG (4096 px)
- UV flatbed printer, or a sublimation setup with a coated blank (wood, hardboard, aluminium)
- Bright white or pale blanks keep the near-white base clean and let the blues pop
Poster / paper print
- The exported high-res PNG sent to a photo lab or printed on bright matte art paper
- A frame; a thin white or pale wood frame keeps the minimalist look
Laser (optional, single water shape)
- Blue acrylic to cut the water as one striking shape, or a light wood or coated tile to engrave it
- Any diode or CO2 laser
- Note: because only water is drawn, the whole hydrology network is a single piece of artwork to cut or engrave
Step 1 - Start from the preset
Open the River Network Map preset. It opens on Amsterdam at zoom 13 in a square (1:1) frame, which captures the full rings of canals - the most recognisable water pattern in the city. Pan so the canal fan sits centred; with nothing else drawn, its shape alone fills the frame. Zoom in to 13.5 to focus on the dense inner rings, or out to 12.5 to bring in the harbour and outer waterways.
Step 2 - Tune the layers
The preset is a single layer group, "Water network", and water is the only thing it draws - so the blues and the near-white base are your whole palette:
- Land background - near-white
#F6FAFB. The clean base that makes the water read as the subject. Keep it pale so the negative space stays quiet and the canals stay loud. - Water bodies and canals - deep blue
#1B6CA8. The main canals and water bodies, the boldest shape in the frame and the backbone of the whole design. - Docks - deep blue
#1B6CA8, matched to the canals so the harbour edges read as one continuous water mass. - Rivers - a
#2E86C1line at width 2.5. The mid-blue arteries that thread between the canal rings. - Streams - a paler
#5DADE2line at width 1.5. The fine tributaries that add the last layer of detail to the network.
The palette is built as a single blue family from deep canals to pale streams. If you recolour, shift the whole set together - a darker navy for a nautical feel, or a single flat blue for a more graphic poster - so the water still reads as one connected network.
Step 3 - Export
- UV / sublimation: export the high-res PNG (4096 px). Keep the Background toggle on so the near-white base prints as a clean field, or turn it off for a transparent background and let a white or pale wood blank become the paper.
- Poster: same high-res PNG, sized to your paper. The square 1:1 frame suits a 12x12 or 20x20 print.
- Laser: export the per-layer SVG ZIP. Because only water is drawn, the combined water layers are a single piece of artwork - cut it from blue acrylic, or engrave it into a light tile.
Choose Your Build Method
UV print / sublimation
- Export the high-res PNG. Leave the Background on for a clean near-white field, or turn it off and print onto a bright white or pale wood blank so the blank becomes the paper - both keep the minimalist look.
- For sublimation, mirror the image and press onto a white-coated wood, hardboard, or aluminium blank per its spec. Bright white stock keeps the blues crisp.
- On a UV flatbed, print straight onto white acrylic, hardboard, or pale wood. A white underbase keeps the blues pure on any non-white stock.
- A matte or satin finish keeps the flat, graphic feel; high gloss can add unwanted reflections to the large blue shapes.
Poster / paper print
- Send the high-res PNG to a photo lab or print on bright matte art paper - a clean white stock sells the minimalist hydrology look.
- Frame in a thin white or pale wood frame to keep the focus on the water shapes.
- The 1:1 square crop is set for you - keep it square, or re-export after switching the aspect ratio for a tall portrait that emphasises a river running down the frame.
Make It Yours
- Other canal and water cities suit this best: Venice, St Petersburg, Stockholm and Bruges all have dense waterways that carry a pure-hydrology print.
- Try a whole river basin instead of a city - the Mississippi delta or a branching river system makes a dramatic, tree-like water shape.
- Recolour the whole blue family to a deep navy for a nautical chart feel, or to a single flat blue for a bolder, more graphic poster.
- Invert the scheme: a near-white water set on a deep blue base reads like a classic blueprint.
- Print on white acrylic with the background off so the blank becomes the paper and the blues float on it.
- Add the city name and coordinates in a thin modern typeface under the map for a clean editorial finish.
- Print large (20x20 square) framed in a thin white frame as a minimalist statement piece, or cut the water from blue acrylic for a layered wall art panel.
New free tools, every month.
New laser cutting tools, what's coming next, and features we're building right now. Only MyLaserTools.com news. No spam, ever.
© 2026 MyLaserTools.com. All rights reserved.