Making a warm desert basin map with the Desert and Dunes Map preset
Difficulty: Easy. Time: under an hour of design time, then your printer's run. Best method: full-colour / UV print (it's a warm-palette print design). A laser version works as a single engraved tonal tile.
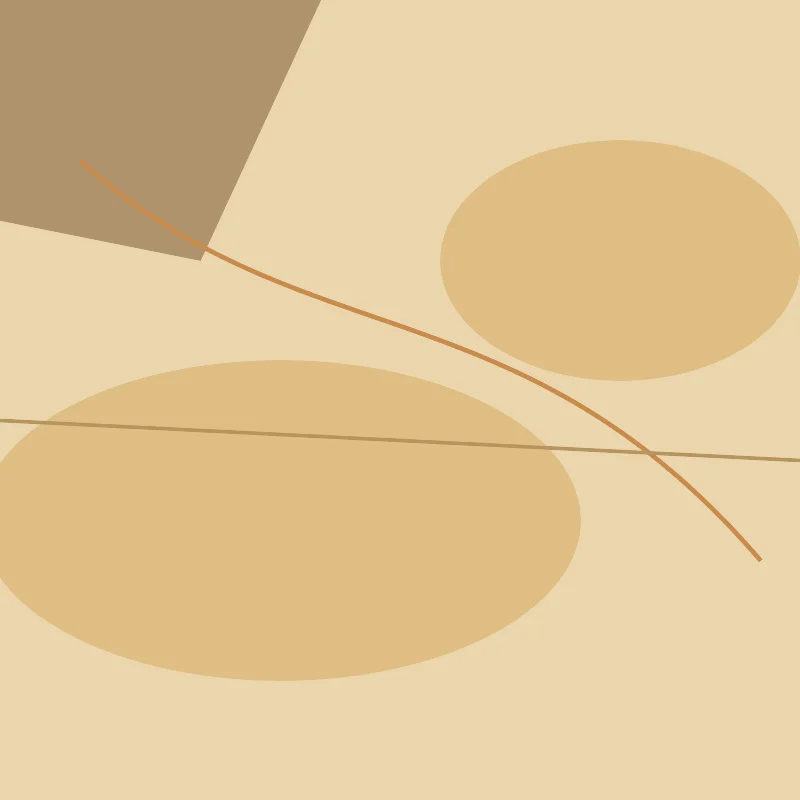
This is a print-first preset with a sun-baked soul. The Desert and Dunes Map draws Death Valley in a warm earth palette - sand and dunes, bare rock, the rare flash of oasis water and the winding lines of dry stream washes, all on a warm sand base. Everything is solid colour fill, so the whole design rides on that quiet, harmonious desert palette. It's made for full-colour and UV prints, framed wanderlust posters and national-park keepsakes rather than for cutting into layers.
Death Valley is a great match: its broad basin, bare rock and the faint traces of dry washes give the warm palette a sparse, elemental texture, and the rare patches of oasis water read as a distinctive shape that anchors the whole frame.
What You'll Need
UV print / sublimation
- The exported high-res PNG (4096 px)
- UV flatbed printer, or a sublimation setup with a coated blank (wood, hardboard, aluminium)
- Warm-toned wood or sand-coloured blanks complement the palette especially well
Poster / paper print
- The exported high-res PNG sent to a photo lab or printed on matte or textured art paper
- A frame; warm wood framing leans into the desert mood
Laser (optional, single tile)
- A warm-toned wood or coated tile that engraves with contrast
- Any diode or CO2 laser
- Note: the warm palette won't survive a laser - use it for a monochrome engraved version
Step 1 - Start from the preset
Open the Desert and Dunes Map preset. It opens on Death Valley at zoom 11 in a square (1:1) frame, which captures the broad basin with its bare rock and dry washes. Pan so the most characterful terrain fills the frame; the rare patches of oasis water are what give the design its anchor. Zoom in to 11.5 for a tighter look at the washes, or out to 10.5 to take in more of the surrounding basin.
Step 2 - Tune the layers
The preset is a single layer group, "Desert basin", and every feature is Solid fill or line - there are no cut or score layers, so the warm palette is your only dial:
- Land background - Solid fill, warm sand
#EAD6AE. The sun-baked base that gives the whole map its desert warmth. Push it lighter for a brighter midday feel or darker for dusk. - Sand / dunes - Solid fill, deeper sand
#E0BE83. The dune fields read as soft, rolling blocks of warm colour over the base. - Bare rock - Solid fill, muted brown
#B0936E. The exposed rock grounds the palette with its earthy mid-tone. - Rare water / oasis - Solid fill, dusty teal
#7FB5C4. The scarce water becomes a distinctive cool shape - one of the few non-warm accents. - Dry stream washes - Solid line, ochre
#C98A4A(width 1.5). The winding traces of seasonal water that thread through the basin. - Primary roads - Solid line, warm tan
#B8945F(width 2.5). The main routes across the desert. - Streets - Solid line, light sand
#CBA877(width 1.5). The fine warm mesh of smaller roads; ease it back if a developed area gets too dense.
The palette is balanced to stay warm and harmonious. If you recolour one layer, keep it in the sand-brown-ochre family so the whole map holds its desert feel rather than turning bright - the oasis water is the one place a cool accent belongs.
Step 3 - Export
- UV / sublimation: export the high-res PNG (4096 px). Keep the Background toggle on so the warm sand base prints as a solid field, or turn it off for a transparent background to let a natural wood blank become the "sand".
- Poster: same high-res PNG, sized to your paper. The square 1:1 frame suits a 12x12 or 20x20 print.
- Laser (optional): export the per-layer SVG ZIP, ignore the colours, and engrave the road and wash network as a single tonal pass.
Choose Your Build Method
UV print / sublimation
- Export the high-res PNG. Turn the Background off and print onto a natural wood blank to let the grain show through as the "sand" - a perfect match for the warm palette - or leave it on for a full sand field.
- For sublimation, mirror the image and press onto a wood, hardboard, or aluminium blank per its spec. Warm-toned blanks deepen the desert feel.
- On a UV flatbed, print straight onto wood, acrylic, or hardboard. A white underbase keeps the sand and ochre tones opaque on darker stock.
- A matte or satin finish suits the sun-baked, dusty look better than high gloss.
Poster / paper print
- Send the high-res PNG to a photo lab or print on matte or lightly textured art paper - texture sells the desert feel.
- Frame in warm wood to complete the wanderlust mood.
- The 1:1 square crop is set for you - keep it square, or re-export after switching the aspect ratio for a portrait travel-poster format.
Make It Yours
- Other striking deserts suit this best: Wadi Rum, the Sahara around Siwa, the dunes near Dubai, or the high Atacama - each gives the warm palette its own basin shape.
- Print on natural wood with the background off so the grain becomes the sand - the single most desert-feeling variant.
- Warm the Land background toward a redder ochre for a Mojave or Wadi Rum sunset look.
- Recolour the oasis water from dusty teal to a brighter turquoise
#4FB0C6for a more vivid mirage-like accent. - Add the park or place name and coordinates in a clean typeface under the map for a complete national-park keepsake.
- Print large (20x20 square) framed in warm wood as a statement wanderlust piece, or small as a set of sand-toned coasters.
- Turn down the Streets layer for a more elemental, sparse version that leans on the bare rock and dry washes.
New free tools, every month.
New laser cutting tools, what's coming next, and features we're building right now. Only MyLaserTools.com news. No spam, ever.
© 2026 MyLaserTools.com. All rights reserved.