Making a glowing neon street map with the Synthwave Sunset Map preset
Difficulty: Easy. Time: under an hour of design time, then your printer's run. Best method: UV / full-colour print (it's a colour-led design). A laser version works as a single engraved tile if you want a physical object.
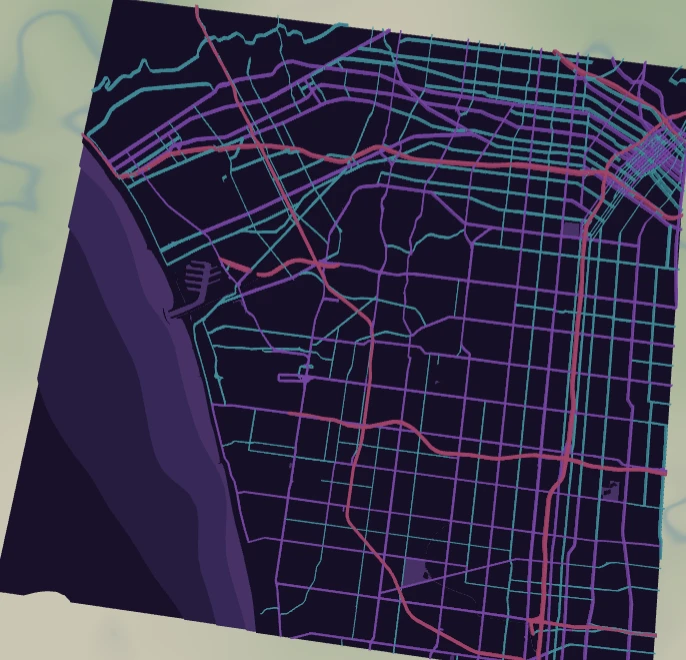
This is a poster-first preset. The Synthwave Sunset Map drops the Los Angeles street network into a neon 80s palette: hot pink motorways, purple primaries and electric cyan secondaries laid over a deep indigo night with violet street fill. Everything is solid colour fill, so the design lives or dies on the print - it's made for UV flatbeds, sublimation blanks and high-res poster prints, not for cutting apart into layers.
Los Angeles is the perfect canvas for it: a sprawling freeway grid means the bright motorway and primary lines fill the whole frame edge to edge, which is exactly the look synthwave is after. Swap in any big freeway city for the same effect.
What You'll Need
UV print / sublimation
- The exported high-res PNG (4096 px)
- UV flatbed printer, or a sublimation setup with a hardboard, aluminium or acrylic blank
- A dark or black substrate works beautifully - the indigo background reads as glow against it
Poster / paper print
- The exported high-res PNG sent to a photo lab or a good inkjet on matte or satin photo paper
- A frame; matte black framing leans into the neon-night mood
Laser (optional, single tile)
- A coated or anodised tile that engraves with contrast (the colours won't survive, so this becomes a tonal engraving)
- Any diode or CO2 laser
- Note: a laser can't reproduce the neon palette - use it only if you want a monochrome engraved version
Step 1 - Start from the preset
Open the Synthwave Sunset Map preset. It opens on Los Angeles at zoom 12.6 in a square (1:1) frame, which captures a wide swathe of the freeway grid - the sweet spot for this look. Pan so a couple of motorway interchanges sit in frame; those hot-pink lines are the star. For a denser, more tangled grid, zoom in to 13.5; for a wider regional sprawl, drop to 12.
Step 2 - Tune the layers
The preset is a single layer group, "Synthwave city", with everything drawn as Solid fill - there are no cut or score layers here, so colour is your only dial:
- Land - Solid fill, deep indigo
#1A0B2E. This is the night-sky base everything glows against. Darken it toward black for more contrast, or push it bluer for a cooler tone. - Water - Solid fill,
#2A1052. A slightly lighter purple so rivers and the coastline read as a subtle shape, not a hard cutout. - Park / landuse - Solid fill,
#231043. Barely-there violet so green spaces add depth without competing with the roads. - Motorway - Solid fill, hot pink
#FF2D95, the thickest line (width 5). The headline colour. - Primary roads - Solid fill, purple
#B14EFF(width 3). The mid-tier glow. - Secondary roads - Solid fill, electric cyan
#00E5FF(width 2). The cool accent that makes the pink pop. - Streets - Solid fill, muted violet
#6B2FB3(width 1). The fine texture mesh; turn it down or off if the frame gets noisy.
The whole palette is colour-balanced as-is. If you change one road colour, nudge the others to keep the pink-purple-cyan triad in harmony.
Step 3 - Export
- UV / sublimation: export the high-res PNG (4096 px). Keep the Background toggle on so the indigo night prints as a solid field. Turn it off only if you want the road lines on a transparent background to drop onto a dark substrate directly.
- Poster: same high-res PNG, sized to your paper. The square 1:1 frame suits a 12x12 or 20x20 print.
- Laser (optional): export the per-layer SVG ZIP, ignore the colours, and engrave the road network as a single tonal pass onto a coated tile.
Choose Your Build Method
UV print / sublimation
- Export the high-res PNG with Background on - the indigo field is part of the design, not a transparency to drop out.
- On a UV flatbed, print straight onto a dark hardboard, acrylic, or aluminium blank. A white ink underbase under the neon lines makes them punch harder on dark stock.
- For sublimation, mirror the image and press onto a coated blank per its time and temperature spec. Aluminium gives the brightest, most poster-like result.
- The neon palette wants a glossy or semi-gloss finish - matte mutes the glow. A clear gloss coat after UV printing lifts the saturation noticeably.
Poster / paper print
- Send the high-res PNG to a photo lab or print on satin/glossy photo paper - glossy holds the neon saturation best.
- Frame behind glass in a black or dark frame; the indigo background then reads as a glowing window.
- The 1:1 square crop is set for you - keep it square, or re-export after switching the aspect ratio if you need a portrait or landscape poster.
Make It Yours
- Big freeway cities suit this best: Los Angeles, Houston, Atlanta, Dubai - anywhere wide arteries fill the frame edge to edge.
- Push the Land colour toward pure black
#000000for maximum neon contrast on a dark substrate. - Flip the accent: make secondary roads hot pink and motorways cyan for a cooler, more Miami-Vice variant.
- Add a coordinates line or the city name in a bold retro typeface under the map before exporting - synthwave loves chrome-style lettering.
- Print it large (20x20 square) on glossy aluminium for a statement piece, or small for a neon-night greeting card.
- Drop a sun-and-grid synthwave motif behind a transparent-background road export for the full 80s album-cover treatment.
- Re-export at a portrait aspect ratio and run the freeway lines vertically for a tall poster format.
New free tools, every month.
New laser cutting tools, what's coming next, and features we're building right now. Only MyLaserTools.com news. No spam, ever.
© 2026 MyLaserTools.com. All rights reserved.