3D printing a raised circuit plaque with the 3D Printed Racing Circuit preset
Difficulty: Easy. Time: a 1.5–3 hour print plus one filament swap. Intended method: 3D printing (FDM) - export 3MF for a two-color red/black plaque, or STL for a single color. It also laser-cuts cleanly if you want a flat acrylic build.
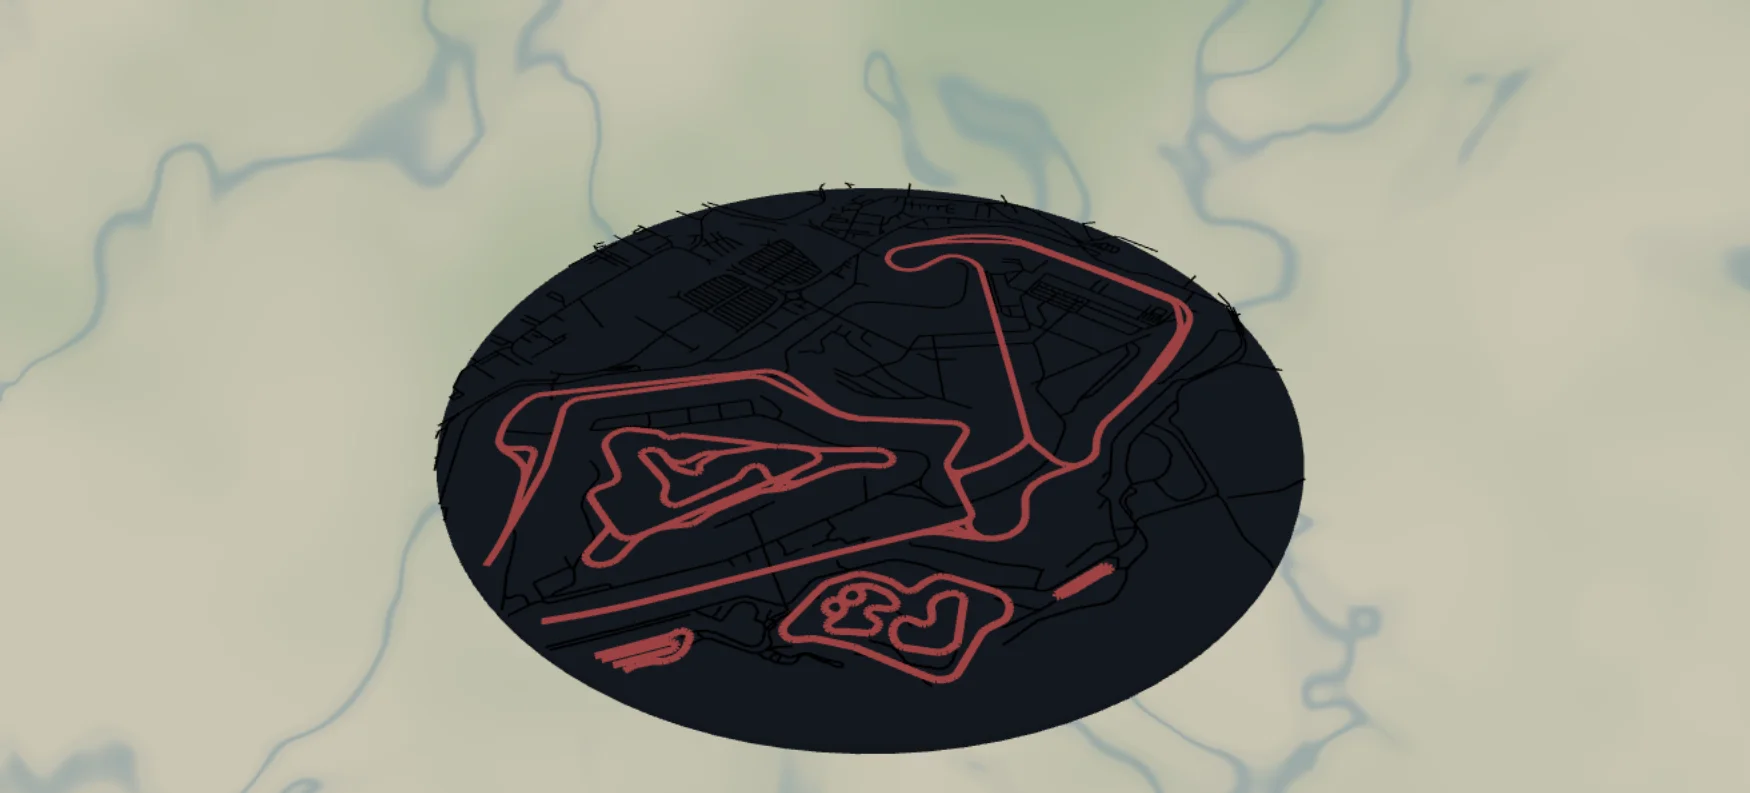
This is the 3D-print sibling of the Race Track plaque. Instead of cutting black acrylic and gluing it to a red backplate, you print a single stacked relief: a solid racing-red disc with the circuit standing proud on top as a continuous raised ridge. It ships set up on Silverstone at zoom 14.2 and works for any circuit on the map - F1, MotoGP, your local kart track.
The track is built as a Solid body, not a laser Score line. A scored centerline has no width and nothing to print; here the raceway is a real filled ribbon (width 9) that becomes a chunky, continuous ridge - and because it's one closed loop, there are no fragile loose strands to worry about on the bed.
What You'll Need
3D printing (intended)
- Any FDM printer; PLA or PETG
- Two filament colors: racing red for the backplate (the preset's
#C0181F) and black (or white) for the raised track ridge - or a single color if you'll paint - A slicer that accepts 3MF (Bambu Studio, PrusaSlicer, OrcaSlicer)
- Optional: keyhole-hanger insert or a small printed easel stand
Step 1 - Start from the preset
Open the 3D Printed Racing Circuit preset. It loads on Silverstone Circuit at zoom 14.2 in a circle frame with a black border ring. Search for any other circuit - Spa, Suzuka, Monza, Laguna Seca, or the local kart track all resolve from the raceway map data.
- Zoom so the full circuit fits inside the circle with breathing room - 13.8–14.5 covers most grand prix tracks; small karting circuits may need 15+.
- Compose around the track's iconic corner - put Eau Rouge or the Suzuka esses where the eye lands first.
- Some venues have multiple layouts (historic + modern); zoom in to confirm which raceway segments are present before committing.
Step 2 - Tune the layers
Two layers, top to bottom:
- Track - Solid body, a single feature: raceway at width 9, black. Because it's a solid line feature with width > 0, it exports as a real filled ribbon - a continuous closed loop. On the print it stands proud of the backplate as a raised ridge. Width 9 is tuned so the ridge is chunky enough to print cleanly at plaque size; nudge it up for small kart tracks that need visual weight.
- Backplate - a solid racing-red (
#C0181F) disc, the physical bottom of the print. The black border ring from the 10-unit global border frames it with a matching raised lip.
Note there are no thin access-road layers here - the laser version engraves those, but at width 2 they are too fine to print as ridges, so the 3D preset drops them for a clean, logo-like silhouette.
Step 3 - Export
- 3D printing (two-color): export the 3MF - the red backplate and the dark track come through as separate objects you assign filaments to in the slicer.
- 3D printing (single color or two-piece): export the STL to print in one filament and paint, or to print the track and backplate as separate parts in different materials and bond them.
- Small-polygon cleanup on, just to tidy any stray fragments from the raceway data.
Choose Your Build Method
Print the track as a raised circuit
- Export the 3MF and open it in your slicer - the racing-red backplate and the dark track ridge come through as separate filament colors.
- Check the scale: 180–250 mm across keeps the width-9 track ridge chunky and continuous. A 250 mm disc is a strong wall size.
- Assign filaments: red for the backplate, black or white for the Track layer. With an STL you print in one color and paint, or set a manual filament change at the height where the track ridge begins.
- Print flat on a smooth plate with 0.2 mm layers, no supports - the track simply steps up off the disc like a real circuit map.
- For a two-piece look, print the track and backplate separately from STL in different materials, then bond them with 3M tape 467 transfer tape.
- Add a keyhole-hanger insert or a printed easel stand.
The closed track ridge means there are no fragile loose strands on the bed - it prints reliably and makes a great gift paired with race-day photos.
Make It Yours
- Engrave or emboss the circuit name, country, and lap record along the border ring before exporting.
- Print the track ridge in white or a livery color - papaya, rosso, silver - over the red plate for a driver tribute.
- Start/finish detail: mark the start line with a small raised dash in a contrasting filament.
- Home-circuit pairing: this preset for the track, the City Map preset for the host town, printed side by side.
- Mini fobs: a 50 mm version with just the Track layer plus a hanger hole, finished with snap clips - batch a whole season calendar of circuits.
- Swap the circle for the hexagon export shape and build a wall of hex plaques, one per circuit visited.
- Print at chunky scale and use the raised ridge as a tactile track for a desk toy.
New free tools, every month.
New laser cutting tools, what's coming next, and features we're building right now. Only MyLaserTools.com news. No spam, ever.
© 2026 MyLaserTools.com. All rights reserved.