Personalizing pencils in batches with the Pencil Engraving Jig
Difficulty: medium. Time: 30 minutes for the jig, then minutes per batch. Methods: laser engraving, UV printing, or 3D printing the jig.
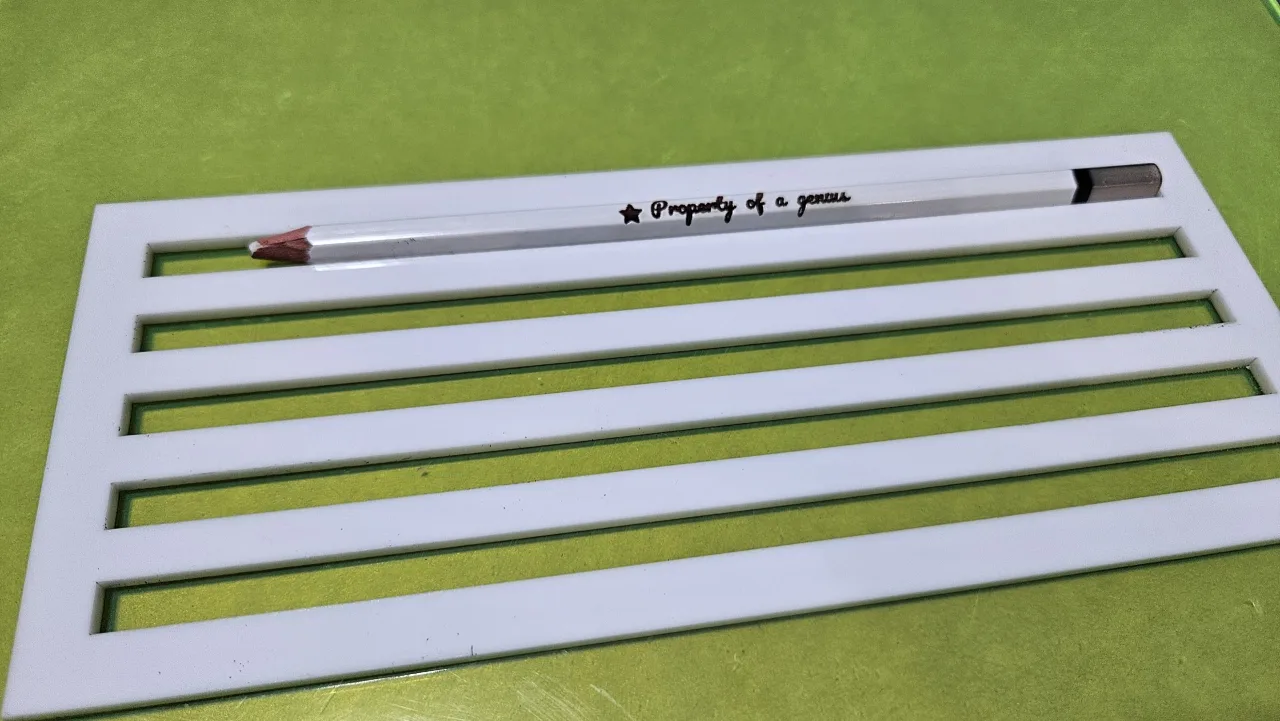
Engraving one pencil is easy; engraving forty, straight and identically positioned, is a fixturing problem. This tool solves it by generating two things that match exactly: a jig sheet with slots that cradle each cylindrical item, and the text artwork pre-positioned over each slot. Cut the jig once, drop in the pencils, run the engrave pass, swap in the next batch.
Presets cover Pencil, Drumstick, Chopstick, and Knitting Needle, and every dimension stays editable, so any roughly cylindrical blank works: pens, dowels, wand blanks, paintbrush handles.
What You'll Need
- Laser: 3 mm laser-grade plywood or MDF for the jig sheet, plus your pencils or blanks
- UV printing: a flatbed UV printer; print the jig PNG template or use the laser-cut jig as the fixture
- 3D printing: any FDM printer if you would rather print the jig than cut it
- 3M tape to lock the jig to the laser bed so batch after batch stays registered
Step 1 - Pick a preset and measure
Open the tool and choose the Pencil, Drumstick, Chopstick, or Knitting Needle preset, then verify Diameter and Length against your actual blanks with calipers. Under Layout, choose Custom Count for a set number of slots or Fill Sheet to pack as many as fit your Sheet Width and Sheet Height. Gap Between Slots and Border Margin control spacing and the structural frame.
Step 2 - Set the text
- Mode: Engrave & Print generates filled text for raster engraving and UV printing; Score generates single-pass vector text, much faster for big batches.
- Type the Text and pick a Font; choose Alignment (Left, Center, Right) along the barrel and fine-tune with Text Size and Position Offset.
- Auto-shrink long text keeps overlong names from running off the end instead of clipping.
- Add an optional Symbol on the Left, Right, or Both ends of the text.
Step 3 - Export
Click Download SVG to get one file with Cut, Slots Cut, and Engrave layers. In Engrave & Print mode you can also Download Print PNG for UV flatbeds, and the STL/3MF section exports the jig as a printable tray with adjustable extrusion depth.
Choose Your Build Method
Cut the jig, engrave the batch
- Cut the jig sheet first: run the Slots Cut and Cut layers only, with the Engrave layer disabled.
- Without moving anything, tape the jig down and drop a pencil into each slot, all facing the same way with the same rotational position (logo or paint seam down).
- Run the Engrave layer only. The text lands centered on each barrel because jig and artwork share one coordinate system.
- Lift out the finished batch, reload, and run the engrave pass again. As long as the jig stays taped, registration holds all day.
- Use Score mode and a single-line font for the fastest cycle time on large orders.
Make It Yours
- Classroom sets: every student's name on a pencil for the first day of school.
- Drumstick pairs engraved with a band name make a fantastic gig merch item.
- Wedding chopsticks with the couple's names and date as table favors.
- Knitting needles labeled with their size near the head, a genuinely useful upgrade for knitters.
- Mix names per slot by editing the text between batches while leaving the jig taped in place.
- Engrave a motivational phrase along one side and a name on the other by flipping the blanks and running a second pass.
- Use Score mode with a single-line font for an elegant handwritten look that engraves in seconds per pencil.
New free tools, every month.
New laser cutting tools, what's coming next, and features we're building right now. Only MyLaserTools.com news. No spam, ever.
© 2026 MyLaserTools.com. All rights reserved.