Making a parks-and-green-space map with the Leisure & Green Map preset
Difficulty: Easy. Time: about 1–2 hours of machine and glue time once your file is exported. Best methods, in order: UV print, laser cutting, 3D printing - the soft greens and accent pinks read best in full color, but engraved or layered wood works beautifully too.
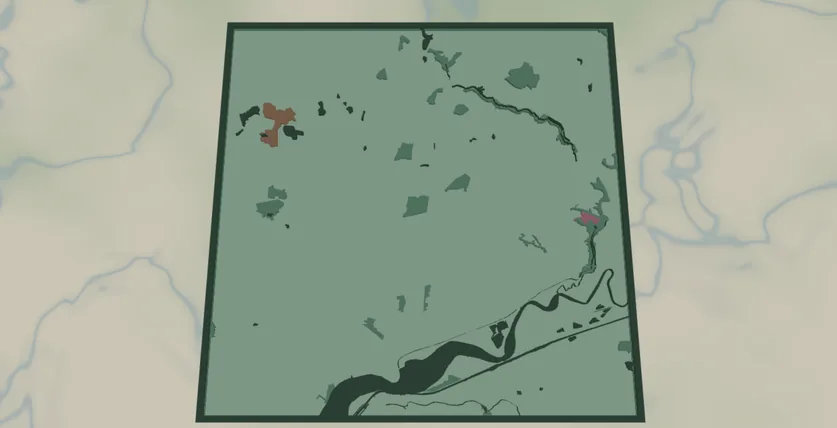
This preset celebrates the parts of a city people actually relax in: parks, theme parks, zoos and playgrounds, all rendered as solid filled shapes over water and a soft mint-green backplate. It opens over the Greater Manchester area at zoom 11, a region threaded with parks and country estates, which shows off the leisure-green palette at its best.
There are no roads or buildings here - just water and green space as clean filled areas. That gives the design a calm, poster-like quality and makes it one of the easiest map projects to produce: no hair-thin geometry, no loose street fragments, just bold blocks of color. It's a natural gift for park lovers, a family that lives near a famous green space, or a city known for its gardens.
What You'll Need
Laser cutting
- 3 mm laser-grade plywood or MDF for the green-space plate (1 sheet)
- 3 mm acrylic or painted ply in soft green for the backplate (or paint it after cutting)
- Any diode or CO2 laser that fits your target size (200×200 mm and up works well)
- Wood glue or CA glue, clamps or weights, sandpaper (220 grit)
3D printing
- Any FDM printer; PLA in 3–4 colors (mint, leaf green, dark green water, pink accent) or a single color
- Slicer that accepts 3MF (Bambu Studio, PrusaSlicer, OrcaSlicer)
UV print / sublimation
- The exported high-res PNG
- UV flatbed printer or sublimation setup with a hardboard/aluminum blank
Step 1 - Start from the preset
Open the Leisure & Green Map preset, search for your city, and pan until its biggest parks sit in the middle. The preset opens over the Manchester region at zoom 11, a wide view that gathers many parks and a stretch of water into one frame. Stay near zoom 11 for a city-region of green spaces; zoom in to 12–13 to feature a single large park or estate in detail.
Step 2 - Tune the layers
The preset has two layer groups. The top group, Green & water, holds five filled features, all Solid mode:
- Water - solid fill, deep green
#2d6a4f. Rivers, lakes and reservoirs, tinted green rather than blue to sit inside the leisure-green palette. Frame your view so some water appears. - Park - solid fill, leaf green
#52b788. The main event: public parks, gardens and recreation grounds. Usually the dominant area on the map. - Theme park - solid fill, pink
#e76f9e. The brightest accent color - theme and amusement parks pop against the greens. - Zoo - solid fill, warm brown
#c08552. Zoos and wildlife parks. - Playground - solid fill, soft yellow
#f2cc8f. Smaller play areas; sprinkles warm accents through the green. - Backplate - solid base plate, soft mint
#b7e4c7. Change this color to match your acrylic or paint.
Toggle off any feature your area doesn't have. A two-tone version (just Park over the mint backplate, with Water) is the cleanest, calmest look; keep the pink Theme park and yellow Playground accents on if you want the design livelier.
Step 3 - Export
- Laser: export the per-layer SVG ZIP - one file per layer. Cut the backplate, then either cut the green-space shapes from contrasting sheets or engrave them as filled areas onto a single plate (engraving keeps small playgrounds from becoming loose fragments). Turn on small-polygon cleanup to drop slivers that would burn away anyway.
- 3D printing: export 3MF for a multicolor stack, or STL for single color.
- UV print: export the high-res PNG (4096 px). Keep the Background toggle on so the mint plate prints as a solid color, or turn it off for a transparent-background print on a colored substrate.
Choose Your Build Method
Laser cutting
All filled areas means two good routes: a layered stack of cut shapes, or a single engraved plate. Engraving is the easier option for the smaller playground and zoo patches.
- Cut the Backplate from your soft-green material first - it's the registration reference for everything else.
- Engrave route: engrave Water, Park and the accent layers directly onto the backplate (or a single ply plate) as filled fills, varying engrave power per layer for tonal contrast. No assembly, no loose pieces.
- Layered route: cut each green-space layer from its own contrasting sheet (a deeper green for parks, a pink acrylic for theme parks). Use masking tape over the sheet before cutting so the smaller patches stay put.
- Glue bottom-up: backplate → water plate → park → zoo/theme park/playground accents. Thin, even glue; weight it flat for 30 minutes - or skip the squeeze-out entirely with 3M tape: 467 or 468 transfer tape for acrylic, 300LSE for harder materials.
- Sand the edges flush, finish with oil or clear spray.
Make It Yours
- Park-rich cities shine here: Manchester, London, Minneapolis, Portland, Munich - anywhere green space dominates the map.
- Swap the backplate to a deeper sage
#74a892for a more grown-up palette, or keep the soft mint#b7e4c7for a fresh, modern look. - Make a single-park feature piece: zoom in to one estate or country park and turn off the other layers for a focused gift.
- Recolor Park to autumn tones (warm orange/brown) for a seasonal version of the same city.
- Engrave the park's name or a coordinates line onto the backplate before assembly.
- Use the Hanger hole ring mounting option and cut at ornament size (~90 mm) for a tree or window decoration - or add a snap clip and call it a keychain.
- Increase the global border padding for a chunkier frame around the whole plate.
New free tools, every month.
New laser cutting tools, what's coming next, and features we're building right now. Only MyLaserTools.com news. No spam, ever.
© 2026 MyLaserTools.com. All rights reserved.