Going bigger than your laser bed with the Joint Panel Generator
Difficulty: easy. Time: 30-60 minutes depending on panel count. Best method: laser cutting in plywood.
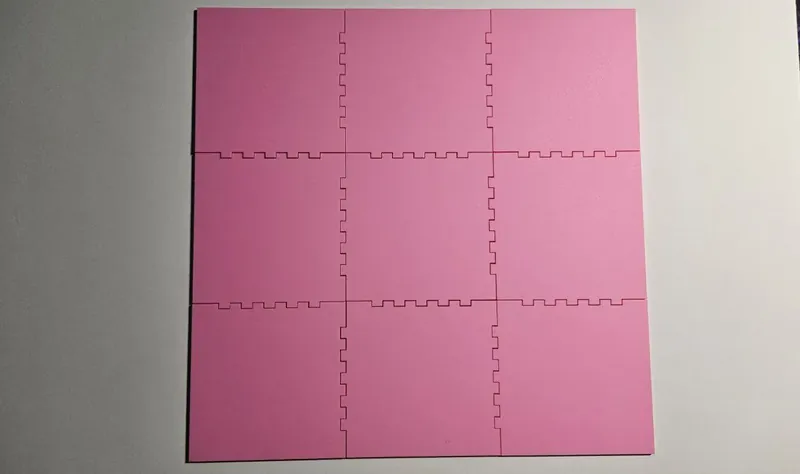
Every laser owner eventually hits the same wall: the project is bigger than the bed. The Joint Panel Generator solves it with interlocking tiles. You define one panel size that fits your machine and how many copies you need, and it generates panels whose edges carry matching finger joints, so the assembled grid locks together into one large, flat, surprisingly rigid surface.
The tool auto-arranges your panel count into the best grid (it skips prime counts above 6, since 7 or 11 panels cannot form a clean rectangle) and can automatically leave outside edges straight so the finished piece has a clean perimeter.
What You'll Need
- A laser cutter; even a small bed works, that is the point
- 3 mm or thicker laser-grade plywood; thicker stock makes stiffer large assemblies
- Wood glue for permanent assemblies
- A flat surface large enough to assemble the full grid
Step 1 - Size one panel
Open the tool, pick your Unit, and set the Width and Height of a single panel (30-300 mm each). Size it to fit comfortably inside your laser bed with margin. Then set the Number of Panels; the tool auto-computes the optimal grid layout, so 12 panels of 200 x 200 mm becomes a 800 x 600 mm finished surface.
Step 2 - Tune edges and joints
- Auto-disable edges without neighbors: leave this checked so the outer border of the assembled grid is straight instead of toothed. Uncheck it if you plan to keep growing the piece later.
- Finger Width: set as a multiple of material thickness (1.5x-3x). Wider fingers assemble faster; narrower ones look finer and hold flatter.
- If the tool shows a validation message, your finger width and panel size combination cannot produce whole fingers; nudge the panel size or finger width until it clears.
Step 3 - Export
Click Download SVG. You get the panel outlines ready for cutting; run as many sheets as the grid needs.
Choose Your Build Method
Cut and assemble the grid
- Engrave your artwork on each panel before cutting it free. Split the full-size artwork into tiles in your laser software using the same grid dimensions, and align each tile to its panel.
- Cut all panels from the same material batch; thickness variation between sheets shows up as joint mismatch.
- Assemble on a flat table, working row by row. Joints should press together by hand or with gentle mallet taps.
- For wall pieces, glue the joints and clamp the assembly flat under weight while it dries.
- Mount with a French cleat or keyhole hangers on the back; a large panel grid is light for its size but needs at least two hanging points.
Make It Yours
- Build a meter-wide world map engraving from 12 tiles on a 300 mm bed.
- Make a modular nursery name sign and add a panel each time a letter or motif joins the family.
- Engrave each panel with a different but related pattern for a quilt-block wall piece.
- Cut panels from alternating wood species for a checkerboard backdrop, joints doubling as the design.
- Leave the assembly unglued and flat-packable for a craft fair booth backdrop that fits in a tote.
- Pair with the Voronoi Panel Generator pattern style on each tile for a giant decorative screen.
- Use a single row of panels for an extra-long welcome sign above a doorway.
New free tools, every month.
New laser cutting tools, what's coming next, and features we're building right now. Only MyLaserTools.com news. No spam, ever.
© 2026 MyLaserTools.com. All rights reserved.