Making an industrial map with the Industrial & Infrastructure Map preset
Difficulty: Easy. Time: about 1–2 hours of machine and glue time once your file is exported. Best methods, in order: laser cutting, UV print, 3D printing - the solid filled shapes suit all three, but engraved fills on wood give industrial themes the most punch.
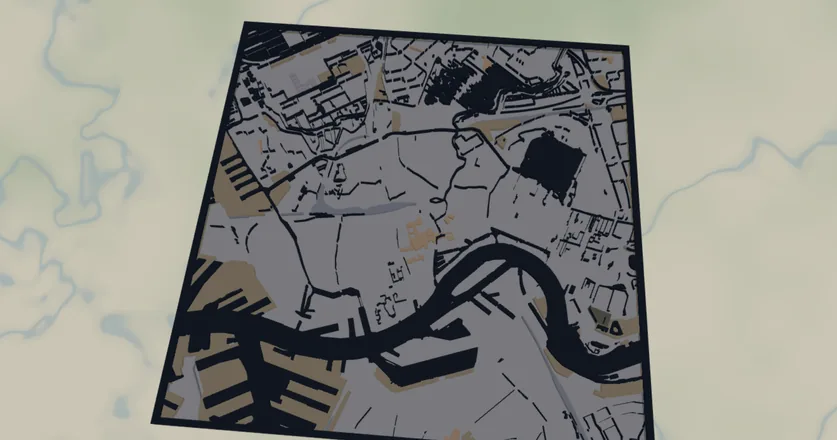
This preset paints the working city rather than the pretty one: industrial estates, rail yards, military land, retail parks and airport aprons, all rendered as solid filled shapes over water and a slate-grey backplate. It's centred on the port of Rotterdam at zoom 12 for a reason - sprawling docklands, container terminals and rail sidings are exactly the kind of large, blocky land use this design is built to celebrate.
Because there are no fine roads here, just filled areas, the design has none of the hair-thin geometry that makes street maps tricky. Each layer comes off the laser or out of the slicer as solid, robust shapes. That makes it a forgiving project and a great gift for someone who works in logistics, rail, aviation or heavy industry, or for any port and factory town.
What You'll Need
Laser cutting
- 3 mm laser-grade plywood or MDF for the land-use plate (1 sheet)
- 3 mm acrylic or painted ply in slate grey for the backplate (or paint it after cutting)
- Any diode or CO2 laser that fits your target size (200×200 mm and up works well)
- Wood glue or CA glue, clamps or weights, sandpaper (220 grit)
3D printing
- Any FDM printer; PLA in 3–4 colors (slate, tan, grey-blue, dark water) or a single color
- Slicer that accepts 3MF (Bambu Studio, PrusaSlicer, OrcaSlicer)
UV print / sublimation
- The exported high-res PNG
- UV flatbed printer or sublimation setup with a hardboard/aluminum blank
Step 1 - Start from the preset
Open the Industrial & Infrastructure Map preset, search for the place you want, and pan until the industrial heart of it sits in the middle. The preset opens over Rotterdam at zoom 12, which captures a whole port-and-rail district. Stay near zoom 12 for sprawling industrial zones; zoom out a notch (11–11.5) for a regional view that takes in an airport plus its surrounding business parks.
Step 2 - Tune the layers
The preset has two layer groups. The top group, Industrial land & water, holds seven filled features, all Solid mode:
- Water - solid fill, dark
#13243b. The harbour basins and rivers that anchor the composition. Frame your view so a dock or river actually appears - it gives the design its shape. - Industrial land - solid fill, tan
#b59b76. The signature layer: factories, warehouses, terminals. This is usually the biggest area on the map. - Railway area - solid fill, blue-grey
#8d99ae. Marshalling yards and sidings - reads strongly in port and freight towns. - Military land - solid fill, olive
#6b705c. Bases and depots; will be empty in most civilian areas, which is fine. - Retail land - solid fill, warm tan
#d4a373. Big-box retail and shopping parks on the city edge. - Garages - solid fill, light grey
#adb5bd. Depots, parking structures and vehicle yards. - Airport apron - solid fill, mauve-grey
#b0a8b9. Terminal aprons and hardstands - prominent if an airport is in frame. - Backplate - solid base plate, slate
#8a909a. Change this color to match your acrylic or paint.
Toggle off any feature that's empty or distracting for your location. A pure rail-and-industry version (just Water, Industrial land and Railway area over the backplate) is clean and very strong.
Step 3 - Export
- Laser: export the per-layer SVG ZIP - one file per layer. Cut the backplate, then either cut the land-use shapes from a contrasting sheet or engrave them as filled areas onto a single plate (engraving keeps the small retail and garage patches from becoming loose fragments). Turn on small-polygon cleanup to drop slivers that would burn away anyway.
- 3D printing: export 3MF for a multicolor stack, or STL for single color.
- UV print: export the high-res PNG (4096 px). Keep the Background toggle on so the slate plate prints as a solid color, or turn it off for a transparent-background print on a colored substrate.
Choose Your Build Method
Laser cutting
Because this design is all filled areas, you have two good routes: a layered stack of cut shapes, or a single engraved plate. Engraving is the easier, more reliable option for the smaller retail and garage patches.
- Cut the Backplate from your slate material first - it's the registration reference for everything else.
- Engrave route: engrave the Water, Industrial land, Railway area and the rest directly onto the backplate (or a single ply plate) as filled fills, varying engrave power per layer for tonal contrast. No assembly, no loose pieces.
- Layered route: cut each land-use layer from its own contrasting sheet. Use masking tape over the sheet before cutting so the smaller patches stay put as they release.
- Glue bottom-up: backplate → water plate → industrial land → rail → retail/garage/apron. Thin, even glue; weight it flat for 30 minutes - or skip the squeeze-out entirely with 3M tape: 467 or 468 transfer tape for acrylic, 300LSE for harder materials.
- Sand the edges flush, finish with oil or clear spray.
Make It Yours
- Port and freight cities shine here: Rotterdam, Hamburg, Long Beach, Felixstowe, Duisburg - anywhere the docks and rail yards sprawl.
- Swap the backplate to deep charcoal
#1f2933for a moodier industrial look, or keep the slate#8a909afor a blueprint feel. - Make a single-theme version: turn off everything except Railway area for a rail-fan map, or everything except Airport apron for an aviation gift.
- Engrave the company name, a plant location or a coordinates line onto the backplate before assembly.
- Use the Hanger hole ring mounting option and cut at ornament size (~90 mm) for a desk or locker decoration - or add a snap clip and call it a keychain.
- Recolor Industrial land to a high-vis safety orange against the slate plate for a bold, signage-style piece.
- Increase the global border padding for a chunkier frame around the whole plate.
New free tools, every month.
New laser cutting tools, what's coming next, and features we're building right now. Only MyLaserTools.com news. No spam, ever.
© 2026 MyLaserTools.com. All rights reserved.