Making handmade product tags with the Handmade Tag Generator
Difficulty: easy. Time: 10 minutes design, 5 minutes lasering per batch, quick to sew. Best method: laser cutting leatherette.
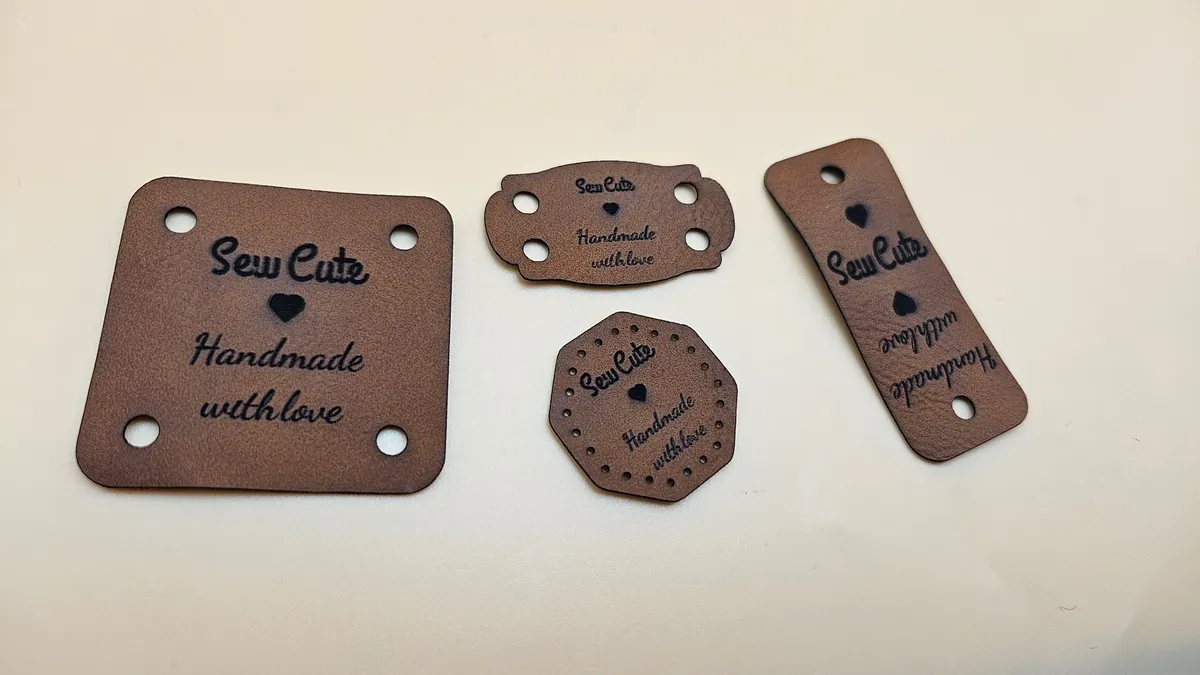
Those little Handmade with love labels folded over a beanie brim? This tool makes them properly. Two tabs set the mode: Regular is a flat tag with the text stacked in the center, and Foldable mirrors the layout - symbol and top text in the upper half, symbol and bottom text rotated 180 degrees in the lower half with a dashed fold line between, so both sides read correctly once folded over an edge. Top and bottom text each get their own font, size, and position, fields accept multiple lines, and the symbol can sit on one or both halves. Attachment is handled too: round stitch holes evenly spaced around the outline, a scored stitch guide line, or plain corner and edge holes.
What You'll Need
- Material: laser-safe leatherette - two-tone sheets give crisp contrasting engraving; real veg-tan leather also works
- Laser: any diode or CO2 laser with good extraction
- Sewing: embroidery floss or strong thread in a matching or deliberately contrasting color
Step 1 - Pick a mode and shape
Choose Regular for flat sew-on labels or Foldable for fold-over brim tags. Pick the Tag Shape and dimensions - the rounded rectangle has a Corner Radius slider and keeps its corners perfectly even at any width. A 60 x 30 mm foldable tag folds to a tidy 60 x 15 mm beanie label.
Step 2 - Text, symbol, and holes
- Set the top text (Sew Cute by default) and bottom text (Handmade with love) - each has its own font picker, size, and move controls, and textareas accept multi-line labels.
- Size the Symbol and choose whether it shows on the top half, bottom half, or both - on foldable tags both halves mirror it by default.
- Text size is a percentage of the auto-fit size, so 100% always fits the engraving region; the layout keeps text clear of holes and the fold line automatically.
- Pick your attachment: stitch holes (evenly spaced round holes around the inset outline - the laser pre-punches every needle pass), a scored stitch guide line, or plain holes at the top, top and bottom, or corners.
Step 3 - Export the SVG
Download the SVG: engrave the text and symbol, score the fold line and any stitch guide, cut the outline and all holes. Gang up a dozen tags per sheet - production runs are the whole point of this tool.
Choose Your Build Method
Laser on leatherette
- Engrave at low power; on two-tone leatherette the goal is a clean reveal of the core color, not depth.
- Score the dashed fold line gently - it should guide the fold, not weaken it.
- Cut outline and stitch holes last. Pre-punched stitch holes mean a needle glides through leatherette that would otherwise fight you.
- Fold foldable tags over the project edge and sew through the matching holes on both halves - the mirrored layout means both sides read right-side-up.
- Sew regular tags flat onto the knit through the corner or edge holes.
Make It Yours
- Brand a whole product line: your maker name on top, Handmade with love below, same tag on every beanie, scarf, and tote.
- Use contrasting floss through the stitch holes as a visible design feature.
- Make care labels: multi-line bottom text fits Hand wash / Dry flat on a flat tag.
- Swap the symbol per collection - snowflake for winter knits, flower for spring market stock.
- Foldable tags on blanket corners look boutique; size up to 80 mm wide.
- Engrave a custom name tag version as a gift for your favorite crocheter.
- Cut a test tag from every new leatherette color and keep a swatch ring of engraving results.
New free tools, every month.
New laser cutting tools, what's coming next, and features we're building right now. Only MyLaserTools.com news. No spam, ever.
© 2026 MyLaserTools.com. All rights reserved.