3D printing a city map Christmas ornament with the 3D Printed Christmas Ornament preset
Difficulty: Beginner · Time: 30–60 minutes of print time per ornament · Intended for 3D printing - the multicolor 3MF reproduces the red-and-gold palette literally as raised gold on a red disc; a single-color STL prints the relief in one filament.
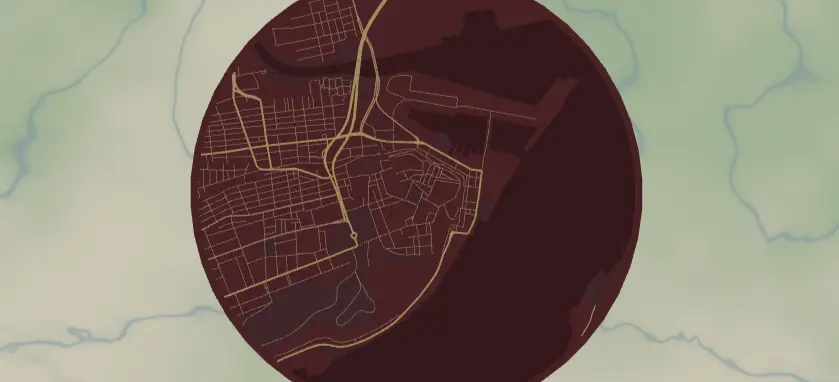
A round map of a meaningful place - the city where you got engaged, grandma's hometown, baby's first Christmas address - styled in deep festive red with gold streets, printed in relief and ready to hang on the tree. The preset frames the city in a circle with a built-in gold border ring, and the export modal adds the hanger hole. It loads on Strasbourg at zoom 13.4. These print fast and personalize in about two minutes per city.
The big advantage of the 3D-print build over a laser engrave: the red-and-gold look is literal here. The deep red land (#7A1F2B) is the backplate, and the gold roads (#F4D58D) and gold border ring print as physically raised lines in gold filament - no two-color acrylic tricks, no paint-filling. Multicolor 3MF gives you that red-disc/gold-roads contrast straight off the printer; a single-color STL still reads beautifully as relief, with the roads standing proud of the surface. Note that Score (line-mode) layers don't 3D-print - they have no width to extrude - so this ornament is built entirely from Solid bodies (the red disc, recessed water) and the Cut outline (the circle and hanger hole).
What You'll Need
3D printing (recommended)
- Any FDM printer; PLA in red and gold (plus a dark red for water if you want the recess to read in color)
- Slicer that accepts 3MF (Bambu Studio, PrusaSlicer, OrcaSlicer); an AMS/MMU or a manual filament swap to get gold roads on a red disc
- Ribbon, twine, or ornament hooks for the hanger hole; ~3–4 mm hole for ribbon, smaller for wire hooks
Laser cutting (alternative)
- Ornament stock ~75–90 mm: gold-on-red two-color acrylic is the cheat code, or Baltic birch with a gold paint pen
- Laser cutter/engraver, ornament hooks or snap clips
Step 1 - Start from the preset
Open the 3D Printed Christmas Ornament preset. It loads on Strasbourg at zoom 13.4 - the old town inside a circle frame with a raised gold border ring. Search for your recipient's city.
Framing tips:
- Zoom 13–14 is the ornament sweet spot: at 80 mm diameter you want a neighborhood-scale map so the raised roads stay thick enough to print and read. Whole-city zooms turn to a tangle of thin lines at this size.
- Center on the landmark, not the geometric city center - the church where they married, their actual street.
- The circle crops aggressively; drag until the most recognizable shape (riverfront, old-town grid) sits in the middle two-thirds.
Step 2 - Tune the layers
The build stacks into a round relief disc, top to bottom:
- Roads - Solid mode, gold (
#F4D58D): motorway (width 6), primary (5). These print as the raised gold ridges - the hero of the ornament. The group carries its own gold border (padding 12), the raised ring that rims the disc. Widths 5–6 keep the roads thick enough to extrude cleanly at 80 mm. - Water - Solid mode, darker red (
#5A1620). Recessed below the land so the river reads as the low channel; in a multicolor print the dark-red filament makes it visible, in single color it reads purely as the carved-down area. - Backplate - solid red disc (
#7A1F2B), the festive base everything rises from. This is the floor of the ornament and sets its thickness.
The global border (gold, padding 12) and the Roads group's border together give the ornament a solid raised rim. Keep it - it's what the hanger hole anchors into and it protects the streets from the edge of the disc.
Step 3 - Export
In the export modal:
- Enable the Hanger hole in the Mounting holes panel - this is the make-or-break option. It adds a ring with a real hole; position it at top center and size it ~3–4 mm for ribbon, smaller for wire hooks. The ring merges with the border so it prints as part of the ornament.
- 3D printing: export the 3MF for the full red-disc / gold-roads / gold-ring multicolor stack, or an STL for a single-filament relief print.
- Small-polygon cleanup on, so stray street fragments don't leave unprintable specks.
- Laser (alternative): per-layer or combined SVG - the circle is the cut, features engrave.
Choose Your Build Method
3D printing the ornament
- Export the 3MF and open it in your slicer - the red backplate disc, gold roads, gold border ring, and recessed water arrive pre-stacked and colored.
- Multicolor: assign red to the disc and water-recess base, gold to the roads and border ring. With an AMS this prints automatically; without one, insert a filament swap to gold at the layer height where the raised roads begin.
- Single-color STL: print the whole relief in one filament - the raised roads and ring still read clearly as relief. Swap to gold partway up if you want the contrast without an AMS.
- Print flat on the bed, no supports - the disc is the base and everything rises from it. The hanger hole prints as a clean through-hole in this orientation.
- Layer height: 0.2 mm. Give the roads and ring 0.6–1.0 mm of raised height so they stand proud of the red disc.
- Scale / minimum size: 75–90 mm diameter is classic tree scale and the floor for this design - much smaller and the gold roads get too thin to print.
- Pop it off the bed, thread ribbon through the hanger hole, and tie a loop.
Make It Yours
- Raise the road and border height taller for a chunkier, more tactile ornament, or lower it for a subtle embossed look.
- Swap the filament palette: forest green disc + warm white roads, or navy + silver for Hanukkah-friendly decor.
- "First Christmas in our new home" series: same city, new house centered, new year, every year.
- Print a garland: five small ornaments of the five cities someone has lived in, strung on one ribbon.
- Use the heart export shape instead of the circle for an anniversary ornament.
- Print the disc in translucent filament and the roads in gold - hung in front of tree lights, the streets glow.
- Batch for markets: keep the layout, swap only the searched city - one print file per town in your region.
New free tools, every month.
New laser cutting tools, what's coming next, and features we're building right now. Only MyLaserTools.com news. No spam, ever.
© 2026 MyLaserTools.com. All rights reserved.