Designing patterned panels with the Voronoi Panel Generator
Difficulty: easy. Time: 15 minutes to design, cut time depends on pattern density. Methods: laser cutting or 3D printing.
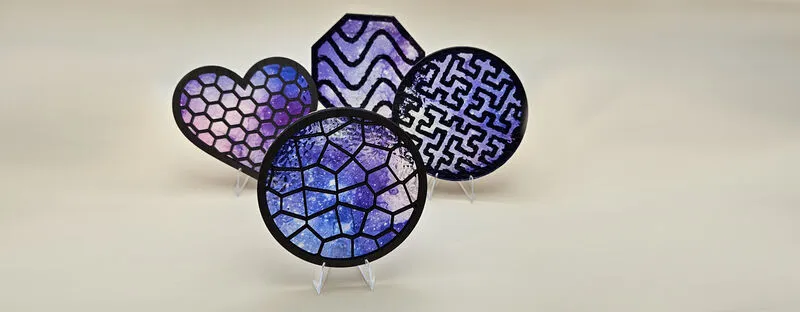
Pattern-filled panels are the pieces that make people ask how you did it: organic voronoi cells, honeycomb grids, hypnotic Hilbert curves, all rendered as a connected lattice inside a solid frame. They work as wall art, lamp shades, trivets, room divider inserts, jewelry, and speaker grilles.
The generator handles the hard geometry: every cell wall is connected, the lattice meets the frame cleanly, and wall thickness is enforced everywhere so the cut result is actually structural instead of confetti.
What You'll Need
- Laser: 3 mm laser-grade plywood or acrylic; patterns in clear or frosted acrylic are stunning with light behind them
- 3D printing: any FDM printer; a second color for the base plate looks sharp
- Anodized standoff spacers for floating wall-mount panels
Step 1 - Shape the panel
Open the tool and pick the panel Shape: Rectangle, Circle, Octagon, or Heart. Set the size (width and Height for rectangles, with Corner Radius), then set the Frame Width, the solid border that gives the lattice its strength and a place to mount.
Step 2 - Choose and tune the pattern
- Pattern: Lines, Dots, Waves, Concentric, Hilbert, Hexagonal, or Voronoi. Voronoi reads organic and natural; Hexagonal reads technical; Hilbert is one continuous folded line that rewards close inspection.
- Cell Size controls pattern density and Wall Thickness controls how chunky the lattice is. For laser cutting keep walls at 1.5 mm or more in 3 mm stock, or the lattice gets fragile.
- Pattern-specific extras appear as needed: Line Angle for lines and waves, Wave Amplitude for waves, Order for the Hilbert curve, and a Seed to reroll voronoi layouts until one feels right.
- For 3D printing, the 3D Print section adds Extrusion Depth and an optional Base Plate with its own thickness, turning the open lattice into a backed relief panel.
Step 3 - Export
Download SVG for cutting, or STL/3MF for printing. The SVG is a single cut layer: the outer outline plus every cell opening.
Choose Your Build Method
Cut the lattice
- Expect a long cut: a dense voronoi panel is mostly cut path. Run a small test square first to confirm your walls survive handling.
- Cut inner cells before the outer outline if your software allows ordering, so the panel never moves while cells are cutting.
- Pop the waste cells out gently from the back; a dense pattern can hold dozens of loose pieces.
- Mask acrylic on both sides to avoid flashback marks across the many cell edges.
- Mount with standoffs about 20 mm off the wall and let raking light throw the pattern as shadow; the shadow is half the artwork.
Make It Yours
- Heart-shaped voronoi panel in frosted acrylic over a warm LED puck for an anniversary light.
- Hexagonal pattern trivets in octagon outlines, printed with a base plate in kitchen colors.
- Four rectangle panels with the same seed family as a sliding-door or cabinet insert set.
- A Hilbert curve panel as nerd decor: one continuous line filling the whole frame.
- Layer a voronoi lattice over a contrasting solid backer cut from the same outline for two-tone wall art.
- Waves pattern with high amplitude in blue acrylic reads instantly as water for beach-house decor.
- Make a lamp shade by cutting four rectangle lattice panels and joining them into a box around a bulb.
New free tools, every month.
New laser cutting tools, what's coming next, and features we're building right now. Only MyLaserTools.com news. No spam, ever.
© 2026 MyLaserTools.com. All rights reserved.