Making a city map t-shirt with the Vinyl T-Shirt Map preset
Difficulty: Beginner–Intermediate (weeding takes patience) · Time: 45–90 minutes · Methods, ranked: 1) HTV + heat press (the intended build), 2) adhesive vinyl decal (laptop, car window, water bottle), 3) sublimation or DTF print from the high-res PNG if you'd rather skip weeding entirely.
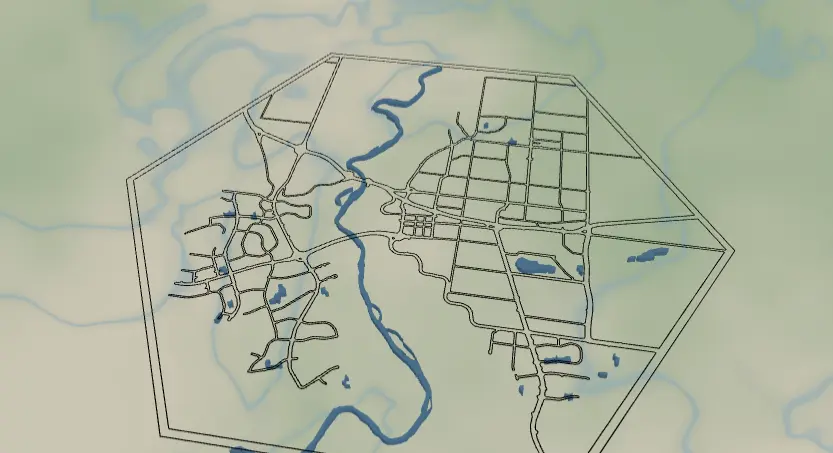
Wear your hometown. This preset turns any city's street grid into a single connected hexagon badge - the major roads of the city rendered as a bold weed-able network with the water cut out as holes - sized for the chest of a t-shirt, hoodie, or tote bag. It's a great gift for someone who just moved away from (or back to) a city they love, and a solid first heat-transfer-vinyl project because the preset is deliberately kept to one cuttable piece.
What You'll Need
HTV / heat press (recommended)
- Heat transfer vinyl, one color (matte black HTV looks fantastic with this preset's all-black design)
- A blank t-shirt, hoodie, or canvas tote - cotton or cotton/poly blend
- Vinyl cutter (Cricut, Silhouette, Brother ScanNCut) or a laser with vinyl-safe settings - never laser-cut PVC vinyl; use only PVC-free HTV if cutting on a laser
- Heat press (or a household iron in a pinch), Teflon sheet or parchment
- Weeding tools: hook, tweezers, good light
Adhesive vinyl decal
- Permanent adhesive vinyl (Oracal 651 or similar), transfer tape, squeegee
Sublimation / DTF print
- Sublimation printer + sublimation paper + polyester shirt, or a DTF printing service and the exported PNG
Step 1 - Start from the preset
Open the Vinyl T-Shirt Map preset. It loads centered on Lethbridge, Canada at zoom 12 - search for your own city instead. The hexagon export shape is already set, with a black border frame (10 padding) that everything connects to.
Framing tips for a wearable design:
- Zoom 11–12.5 works best: you want the major road skeleton, not every cul-de-sac. The more roads in frame, the more weeding you'll do.
- Drag the map so a recognizable feature - a river bend, the downtown grid, a coastline - sits near the middle of the hexagon. That's what makes people say "hey, that's my city."
- A river or lake helps a lot here: the Water layer punches it out as negative space, which reads beautifully on fabric.
Step 2 - Tune the layers
The preset has two layer groups:
Roads - this is a Cut-mode layer (outline: true): every road is buffered into a contour and merged with the hexagon border frame so the whole design exports as one connected piece. That's exactly what you want for vinyl - nothing falls off the carrier sheet, and the transfer goes on in one pass. It includes five road classes with stepped widths:
- Motorways (width 5) and motorway links (4)
- Primary roads (4)
- Secondary roads (3)
- Tertiary roads (2)
Width matters more than usual here. Stroke widths are relative to the design, so the physical line width depends on your final press size. At a typical 250 mm chest print, the width-2 tertiary roads come out well under 1 mm wide - borderline to weed and prone to lifting in the wash. Two easy fixes: bump tertiary up to 3–4, or remove the tertiary feature entirely for a cleaner, bolder badge. When in doubt, fewer + thicker roads always weeds and washes better.
Water - a Solid layer with invertAsHoles enabled, so rivers and lakes become holes punched out of the design rather than printed shapes. Leave the fill color alone - once inverted it doesn't print, it just defines the cutouts. If your city has lots of tiny ponds, you'll get lots of tiny holes; turn on small-polygon cleanup at export to drop them.
Step 3 - Export
Open the export modal:
- HTV / adhesive vinyl: download the combined SVG (or the Roads layer SVG) - it's one merged outline your cutter software ingests directly. Keep the water-inversion toggle on so the holes are baked in.
- Sublimation / DTF: use the high-res PNG (4096 px) and turn the Background toggle off for a transparent PNG - essential so only the map prints, not a white hexagon block.
- Turn on small-polygon cleanup to remove slivers too small to weed.
- Skip the mounting-hole options - they're for rigid materials, not fabric.
Choose Your Build Method
HTV with a vinyl cutter and heat press
- Import the SVG into your cutter software (Design Space, Silhouette Studio) and size it: 220–260 mm wide suits an adult medium chest.
- Mirror the design horizontally - HTV cuts from the back. This is the step everyone forgets once.
- Cut with HTV shiny-side (carrier) down; do a small test cut first - kiss-cut through the vinyl, not the carrier.
- Weed: remove everything except the roads and frame. Start from the outside, work inward, and pull slowly so thin roads stay anchored. Good raking light makes the cut lines pop.
- Pre-press the shirt 5 seconds to drive out moisture, position the design (center it ~7–8 cm below the collar), and press per your vinyl's spec (typically ~150 °C / 305 °F, 10–15 s, medium pressure).
- Peel the carrier (hot or cold per the vinyl), cover with parchment, and give it a 5-second second press to lock the fine roads down.
Care note: wash inside-out, cold, no dryer heat - fine tertiary roads are the first thing to lift if you cook them.
Adhesive vinyl decal
- Cut the same SVG not mirrored on permanent vinyl.
- Weed as above, then lay transfer tape over the design and burnish well - the frame holds everything in register.
- Apply to a clean laptop lid, water bottle, or rear car window; squeegee, then peel the tape at a sharp angle.
Make It Yours
- Swap the hexagon for a circle or heart export shape - the Cut-mode frame adapts automatically.
- Two-city shirt: press two smaller hexagons side by side ("where we met / where we live").
- Drop tertiary roads and bump motorway width to 6–7 for a chunky, minimalist badge that weeds in five minutes.
- Metallic or glitter HTV turns the street grid into a statement piece; flock HTV gives a vintage athletic feel.
- Add your neighborhood instead of the whole city - zoom to 14 and let one district's grid fill the hexagon.
- Use the same export on a canvas tote or a denim jacket back panel (size up to 300 mm - and bump all the widths to match).
- Pair with a text layer of the city's coordinates pressed in a second color beneath the hexagon.
New free tools, every month.
New laser cutting tools, what's coming next, and features we're building right now. Only MyLaserTools.com news. No spam, ever.
© 2026 MyLaserTools.com. All rights reserved.