Making layered mountain terrain art with the Topography preset
Difficulty: Advanced (lots of layers). Time: an afternoon for cutting and glue-up. Best methods, in order: laser cutting, 3D printing, UV print.
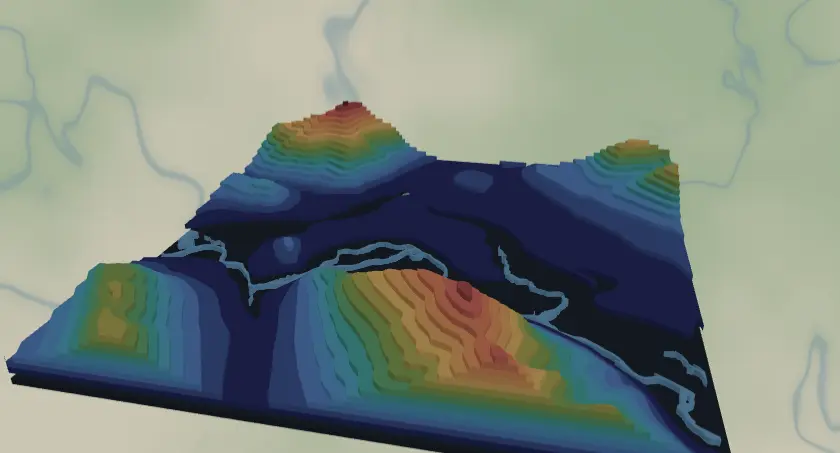
This preset turns a mountain range into stacked elevation contours: sixteen layers stepping from 1400 m up to 2900 m, with water and a dark backplate underneath. Cut from thin sheets it becomes true 3D relief art; printed it becomes a one-piece terrain model. It loads on the peaks around Banff and works anywhere with serious vertical.
What You'll Need
Laser cutting
- Up to 16 contour sheets - use thin stock so the stack stays reasonable: 1.5–2 mm laser-grade plywood, chipboard, or matboard (3 mm works but the stack gets ~50 mm tall)
- One sheet for the backplate (dark stain or paint,
#1f2937charcoal in the preset) and optionally blue for water - Laser cutter, plenty of glue, weights, patience
3D printing
- FDM printer, single-color PLA (white or stone gray looks great) or multicolor via 3MF
- 3MF-capable slicer
UV print / sublimation
- High-res PNG, flat blank - the flat render reads as a stylized contour poster
Step 1 - Start from the preset
Open the Topography preset. It loads near Banff at zoom ~11.9 - a valley-to-summit window. Search your mountain and keep zoom around 11.5–12.5: wide enough that the contour rings nest into satisfying terraces, tight enough that each 100 m step is visible. Important: the preset's elevation bands run 1400–2900 m. If your terrain sits lower or higher (say, the Smokies or the Himalaya), retune the per-layer elevations in Step 2 or most layers will come out empty.
Step 2 - Tune the layers
- Topography 2900m down to Topography 1400m - sixteen topography layers at 100 m intervals. Each renders the terrain above its elevation as a plate. Check the preview: layers that show nothing (elevation above your peak) should be deleted, and if big areas show no terracing, add or shift elevations to bracket your terrain. Fewer, well-chosen layers (8–10) often look better than all 16.
- Water - Solid mode,
#4EA8DE. Mountain lakes and rivers sit just above the backplate, so they appear in the valley floors. - Backplate -
#1f2937dark slate. The lowest "ground" visible in valleys.
Step 3 - Export
- Laser: per-layer SVG ZIP - sixteen-plus files, one per sheet. Small-polygon cleanup is essential here: high elevations produce tiny outlier islands that are ungluable. Hide any empty elevation layers with the visibility toggles before export.
- 3D printing: STL or 3MF - the stack becomes a stepped terrain model automatically.
- UV print: high-res PNG for the flat contour-poster look.
Choose Your Build Method
Laser cutting
- Label everything. With this many layers, write the elevation on the back of each sheet as it comes off the laser.
- Cut the Backplate, then Water, then contours bottom-up: 1400 m, 1500 m, … 2900 m.
- Dry-fit the full stack before any glue. Nested contour rings only fit one way - confirm the registration against the on-screen preview.
- Glue one layer at a time, aligning each ring against the printed reference. Weight between layers if your stock wants to curl. 3M tape 300LSE between layers skips the drying time entirely (467 or 468 if you cut acrylic).
- Finish: a light coat of matte clear unifies mixed sheet edges; or paint the top few layers white for snowcaps.
Make It Yours
- Great subjects: Banff/Canmore (the default range), Chamonix, the Tetons, Yosemite's walls, your local ski hill.
- Retune the band: 100 m steps from the valley floor of your mountain - e.g., 600–2100 m for the Alps' mid ranges.
- Hypsometric palette via 3MF: greens low (
#4C7A4C), tans mid (#C2A878), white above 2600 m. - Ski-run gift: add a route layer tracing the favorite descent over the contours.
- Halve the layer count (200 m steps) for a faster, bolder version that still reads as terrain.
- Use clear acrylic for every layer - a ghost mountain you can see through.
- Swap the backplate to
#4EA8DEblue for coastal mountains so the sea reads as water at 0 m.
New free tools, every month.
New laser cutting tools, what's coming next, and features we're building right now. Only MyLaserTools.com news. No spam, ever.
© 2026 MyLaserTools.com. All rights reserved.