Making a city map coaster with the Sublimation Coaster Map preset
Difficulty: easy. Time: 30–45 minutes per pressing session (a 4-pack presses in one go). Best methods for this preset, in order: sublimation, UV printing, 3D printed plaque, laser engraving.
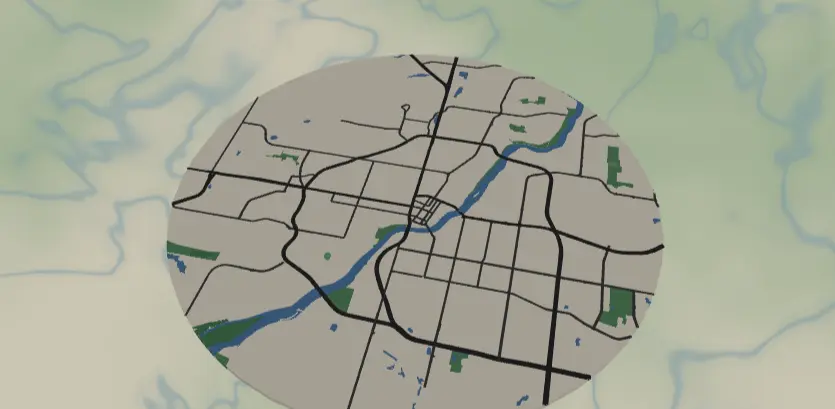
This preset turns a whole city into a round, full-color coaster: cream land, saturated green parks, a bold blue river, and dark charcoal roads that survive the sublimation press without washing out. It's the easiest map project in the toolkit and a great first sublimation job - perfect for housewarming gifts, Airbnb hosts, or a set of four coasters of cities you've lived in.
What You'll Need
- Sublimation: sublimation printer (Epson EcoTank converted or SG500-class), sublimation paper, 90–95 mm round poly-coated coaster blanks (hardboard, ceramic, or neoprene), heat-resistant tape, butcher paper, heat press (flat, 180–205 °C range)
- UV printing: flatbed UV printer, round coaster blanks (wood, acrylic, slate, or cork), jig or alignment template for round blanks
- Laser engraving: diode or CO2 laser, 3–4 mm laser-grade plywood or solid hardwood, masking tape (optional)
- 3D printing: multi-color-capable printer (AMS / MMU or manual swaps), PLA in cream, green, blue, and charcoal
Step 1 - Start from the preset
Open the Sublimation Coaster preset. It loads Saskatoon at zoom 11.2 in a circle export shape - that zoom is the point: it frames the whole city without drowning the coaster in tiny streets. Search your own city, then nudge the center so the river or a signature park lands near the middle of the circle. If your city is sprawling, drop to zoom 10.5–11; if it's compact, 11.5–12 still keeps detail coarse enough to read at 90 mm. Resist zooming past ~12.5 - fine street grids turn to noise at coaster size.
Step 2 - Tune the layers
Everything lives in one Solid layer group called City map:
land-#F5F0E6cream background. Keep it warm; pure white land disappears on white blanks.landusePark#4F9D5D,landuseRecreation#6BB274,landcoverForest#3E8B52- three greens that give parks depth. Swap all three toward one hue family if you want a flatter, more graphic look.water#2B7FBFandwaterwayRiver#2B7FBFat width 4 - the river is a filled ribbon, not a hairline, so it presses cleanly.roadsMotorway#2F2F2Fwidth 5,roadsPrimary#2F2F2Fwidth 4,roadsSecondary#454545width 3 - these were deliberately set dark and wide because sublimation washes out subtle grays. Don't lighten them below ~#555555or they'll fade into the land color on the press.
Widths above 0 render as real filled ribbons, so what you see is what prints. If your city has very few highways, bump roadsSecondary to width 4 to keep the network reading.
Step 3 - Export
- Sublimation / UV: use the high-res PNG export (4096 px). The cream
#F5F0E6land is close to white - on white blanks you can also toggle Background off for a transparent PNG and let the blank be the land; keep the background on for natural-toned cork or wood blanks. - Laser: export the combined SVG (or per-layer ZIP if you want to engrave greens and roads at different power).
- 3D print: export 3MF - the stacked color plaque maps each fill color to a filament.
- Mounting holes aren't needed for a coaster; pick Hanger hole only if you're repurposing the circle as an ornament. Small-polygon cleanup is worth enabling at city-wide zoom to drop sliver parks that would render as specks.
Choose Your Build Method
UV printing
- Export the 4096 px PNG (background on for cork/wood, off for pre-colored blanks).
- Place the PNG in your RIP, sized to the blank diameter minus 1–2 mm so the circle never overhangs the edge.
- Set a white-ink underbase if printing on dark cork or slate; skip it on light wood.
- Drop blanks into a jig, run a low-power outline pass or use the camera to verify registration.
- Print, then let the ink cure fully before stacking.
Sublimation
- Print the PNG mirrored onto sublimation paper at 100% scale, one circle per blank (gang four up for a set).
- Trim each print with ~5 mm margin and tape it face-down to the coated side of the blank with heat tape.
- Sandwich in butcher paper above and below to protect the platen.
- Press with the settings recommended for your material, paper, and inks (start from your blank vendor's spec).
- Peel hot in one smooth motion and let the blank cool flat.
Make It Yours
- Press a set of four - the four cities of your life, identical palette, instantly a gift box.
- River towns shine here: Winnipeg, Pittsburgh, or Lyon let the
#2B7FBFwater do the heavy lifting. - Autumn palette swap: land
#F2E4CE, parks#C77B3B/#A85C32/#8B4A28, keep roads#2F2F2F. - Night mode swap: land
#1B1F2A, roads#F2F2F2- then UV print on black cork instead of sublimating. - Toggle Background off and sublimate onto natural cork so the cork texture becomes the land.
- Add a route layer tracing your daily commute or favorite running loop in a contrast color like
#E63946before exporting. - Switch the export shape to heart and re-export for a Valentine's coaster without touching the palette.
- Pick Hanger hole in the export modal, cut from 3 mm ply, and the same artwork becomes a city ornament.
New free tools, every month.
New laser cutting tools, what's coming next, and features we're building right now. Only MyLaserTools.com news. No spam, ever.
© 2026 MyLaserTools.com. All rights reserved.