Making an engraved journal cover with the Leatherette Journal Cover Map preset
Difficulty: Beginner · Time: 20–45 minutes · Methods, ranked: 1) Laser engrave on a pre-made laserable leatherette journal (fastest, most giftable), 2) engrave a leatherette/leather sheet and bind or wrap it yourself, 3) the same art engraved on a wooden journal or clipboard cover.
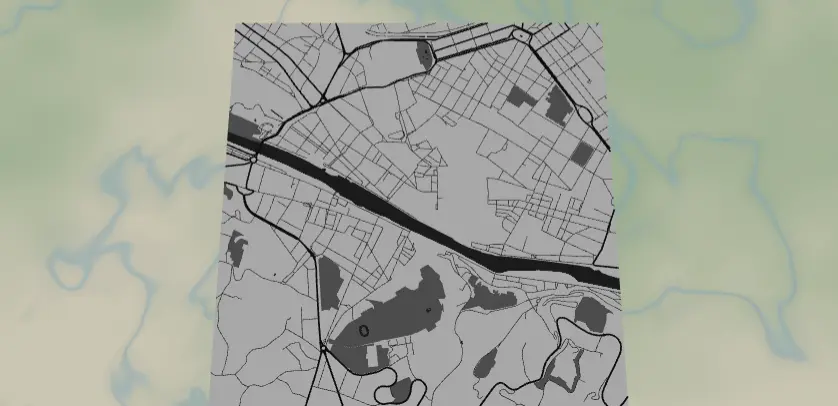
A full-bleed monochrome street map engraved across the cover of a leatherette journal - the city where the journal's stories will happen. The preset ships set up on Florence at a dense, romantic zoom and is tuned for the way leatherette engraves: bold roads, dark water, no border, edge-to-edge texture. It works on pre-made laserable journals, on leatherette sheets you wrap your own cover with, and equally well on real vegetable-tanned leather.
What You'll Need
Pre-made journal (recommended)
- Laserable leatherette journal/notebook (the PU "saddle collection" style blanks - engrave to a contrasting core color). Confirm it's PU leatherette, not PVC - PVC must never go in a laser.
- Laser engraver with enough bed for the cover (A5 journal ≈ 215 × 145 mm cover); a honeycomb pin-down or jig to keep the cover flat
Sheet + DIY binding
- Laserable leatherette sheet (they come in different thicknesses) or 1–1.5 mm veg-tan leather, contact cement or stitching supplies, the notebook to cover
Step 1 - Start from the preset
Open the Leatherette Journal Cover Map preset. It loads on Florence at zoom 13.8 - dense medieval streets and the Arno cutting through, which is exactly the texture this design thrives on. Search for the city that matters to the journal's owner.
Framing tips:
- Zoom 13.5–14.5: you want street-level density that reads as rich texture across the whole cover.
- The preset's frame is square (1:1), but journal covers are portrait - switch the export aspect ratio to a taller one (or plan to engrave the square as a centered panel). For a full-bleed A5 cover, a roughly 2:3 portrait crop matches best.
- Put the river or the landmark district slightly off-center toward the outer (right) edge of a front cover - the spine side gets visually swallowed.
Step 2 - Tune the layers
One layer group, Cover engraving (Solid mode), as a grayscale engraving palette:
- Land - white (
#FFFFFF): untouched surface. - Water - dark (
#2F2F2F): the deepest engrave; the Arno becomes the cover's anchor stroke. - Parks - mid grey (
#777777): light texture pass. - Roads - motorway (width 4), primary (3), secondary (2) in near-black
#1A1A1A, and neighborhood streets (width 1) in#2E2E2E. The width-1 street net is what gives the "fabric of the city" feel at journal scale; on very textured leatherette or at small cover sizes, bump streets to 2 so they don't fuzz out.
Engraving is monochrome, so these greys act as power/depth hints: distinct tones = distinct engrave depths if your software maps grayscale to power; otherwise everything non-white engraves uniformly, which still looks sharp.
Step 3 - Export
In the export modal:
- Download the high-res PNG (4096 px) for raster engraving (most laser software handles grayscale PNG → power mapping best), or the per-layer SVG if you prefer vector fills.
- Background toggle: keep it on for the PNG so land is solid white (no engrave) rather than transparent.
- Small-polygon cleanup on - Florence-density maps generate thousands of slivers you don't need.
- Mounting holes: none. Nothing gets cut on a pre-made journal. (If you're doing the DIY sheet method and want a stitched edge, the Stitch holes option plus an outer cut line turns the sheet into a sew-it-yourself wrap.)
Choose Your Build Method
Engrave a pre-made leatherette journal
- Size the art to the front cover with a 3–5 mm safety margin from the edges and spine, or go true full-bleed if your jig registration is solid.
- Jig the journal: square it to the bed against a corner fence and run a low-power frame trace to confirm position. Covers bow - weigh down or pin the edges outside the engrave area.
- Engrave: leatherette wants low power / high speed. Run a 15 mm test square on the back cover near the spine to dial in the contrast before committing the front.
- Watch the first minute - dense street texture at the wrong power turns muddy. Stop and re-dial early rather than late.
- Wipe down with a dry or barely damp microfiber.
Engrave a sheet and wrap your own
- Engrave the art onto a leatherette sheet cut oversized for your notebook (cover + spine + flaps).
- Cut the wrap outline on the laser in the same job so engraving and cut are registered.
- Glue (contact cement, applied to both faces, joined when tack-dry) or stitch the wrap onto the notebook cover.
Wood-cover journal
The same PNG engraves beautifully on bamboo or birch journal covers - deeper power, and the burn tone replaces the leatherette contrast.
Make It Yours
- Wrap-around map: widen the crop so the map flows over the spine and onto the back cover - the river crossing the spine is a killer detail.
- Engrave a name, date, or "Florence - 2026" in a small clear panel: add a rectangle of untouched land by nudging the frame so a quiet area sits at the bottom corner, then engrave text there in your laser software.
- Travel journal series: one journal per city visited, same style, spines lined up on a shelf.
- Subtle mode: delete water and parks, keep only the street net at width 1–2 for a whisper-quiet all-over texture.
- High-drama mode: invert the idea - set land dark and roads white in the preset, so the laser engraves everything but the streets (long job, stunning result on two-tone leatherette).
- Match a set: engrave the same crop on the journal, a leatherette luggage tag, and a patch (both have their own presets) for a coordinated travel kit.
- Real leather: on veg-tan, the engrave burns a rich dark brown - finish with leather balm to deepen the contrast.
New free tools, every month.
New laser cutting tools, what's coming next, and features we're building right now. Only MyLaserTools.com news. No spam, ever.
© 2026 MyLaserTools.com. All rights reserved.