Making a layered city map with the Classic Layered City Map for Laser Cutting preset
Difficulty: Easy. Time: about 1–2 hours of machine and glue time once your file is exported. Best methods, in order: laser cutting (it's tuned for it), 3D printing, UV print.
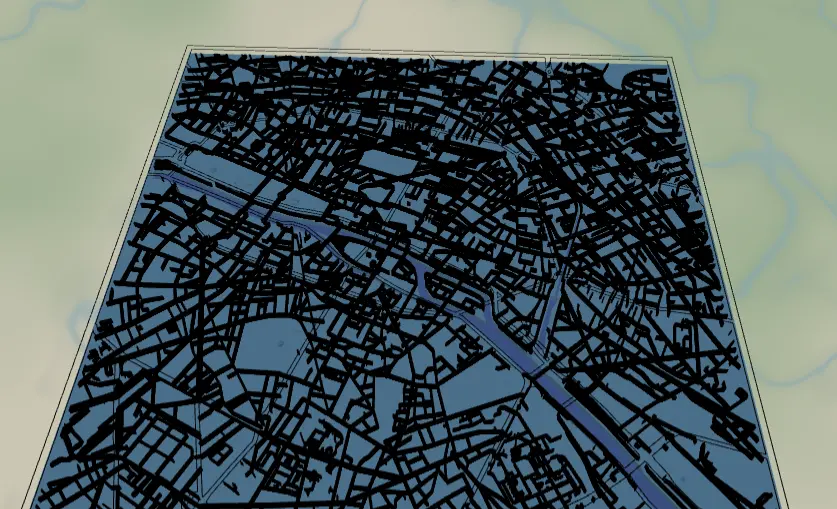
This preset builds the classic three-material city map: a blue backplate, a land plate with the water cut out as holes, a layer of minor streets, and the major roads cut as a connected lattice. It's the go-to project for a first map gift - a hometown, a honeymoon city, the street where someone grew up.
What You'll Need
Laser cutting
- 3 mm laser-grade plywood or MDF for the land plate and major roads (2 sheets)
- 3 mm acrylic or painted ply in blue for the backplate (or paint it after cutting)
- Any diode or CO2 laser that fits your target size (200×200 mm and up works well)
- Wood glue or CA glue, clamps or weights, sandpaper (220 grit)
3D printing
- Any FDM printer; PLA in 2–3 colors (blue, white/natural, black) or a single color
- Slicer that accepts 3MF (Bambu Studio, PrusaSlicer, OrcaSlicer)
UV print / sublimation
- The exported high-res PNG
- UV flatbed printer or sublimation setup with a hardboard/aluminum blank
Step 1 - Start from the preset
Open the City Map preset, search for your city, and pan until the part of town you care about sits in the middle. The preset starts at zoom 13, which captures a whole downtown plus surrounding neighborhoods - a good default for cities with a river or coastline running through them. Zoom in a notch (13.5–14) for dense old-world cities, out a notch (12–12.5) if you want the whole metro shape.
Step 2 - Tune the layers
The preset has four layers, top to bottom:
- Major roads - Cut mode. Motorways and primary roads get buffered into a connected lattice merged with a border frame, so the whole layer comes off the laser as one piece. If your city has no motorways near the center, this layer can look sparse - pan until a couple of big arteries cross the frame.
- Minor roads - Solid mode. Streets, minor, secondary, and tertiary roads as filled ribbons. This is the texture layer; if it looks too busy, toggle off
roadsMinorand keep the rest. - Water - Solid mode with invert as holes on. The river and lakes are subtracted from a land plate, so the blue backplate shows through. This layer is what makes the design read as a map at a glance - frame your view so water actually appears.
- Backplate - solid base plate,
#236cd1blue. Change this color to match your acrylic or paint.
Step 3 - Export
- Laser: export the per-layer SVG ZIP - one file per layer, cut each from its own sheet. Leave water inversion on. Turn on small-polygon cleanup to drop slivers that would burn away anyway. Add a hanger hole ring if it's going on a string instead of a wall frame.
- 3D printing: export 3MF for a multicolor stack, or STL for single color.
- UV print: export the high-res PNG (4096 px). Keep the Background toggle on so the land plate prints as a solid color, or turn it off for a transparent-background print on colored substrate.
Choose Your Build Method
Laser cutting
- Cut the Backplate from your blue material first - it's the registration reference for everything else.
- Cut the Water layer (the land plate with water holes) from 3 mm ply.
- Cut Minor roads. Solid-mode street ribbons come off as many small pieces - use masking tape over the sheet before cutting so fragments stay in place, or skip cutting this layer entirely and engrave it onto the land plate instead (engraving is the more reliable option for fine street grids).
- Cut Major roads - it's a Cut-mode layer, so it arrives as one connected lattice with a frame.
- Glue bottom-up: backplate → land plate → minor roads (or engrave) → major roads lattice. Thin, even glue; weight it flat for 30 minutes - or skip the squeeze-out entirely with 3M tape: 467 or 468 transfer tape for acrylic, 300LSE for harder materials.
- Sand the edges flush, finish with oil or clear spray.
Make It Yours
- River cities shine here: Paris, London, Pittsburgh, Lyon - anywhere the water holes cut a strong shape.
- Swap the backplate to deep navy
#0E4C66for a nautical feel, or warm sand#D9B382for desert cities. - Turn off the Minor roads layer for a bold, minimal two-layer version that cuts in half the time.
- Add a heart icon from the export modal over "your" spot - house closing gifts love this.
- Use the Hanger hole ring mounting option and cut at ornament size (~90 mm) for a tree decoration - or add a snap clip and call it a keychain.
- Increase the global border padding for a chunkier frame on the Cut layer.
- Engrave street names or a coordinates line onto the backplate before assembly.
New free tools, every month.
New laser cutting tools, what's coming next, and features we're building right now. Only MyLaserTools.com news. No spam, ever.
© 2026 MyLaserTools.com. All rights reserved.