Making a canyon-and-river relief with the Canyon River preset
Difficulty: Medium. Time: a half day with glue-up. Best methods, in order: 3D printing (the dual relief shines), laser cutting, UV print.
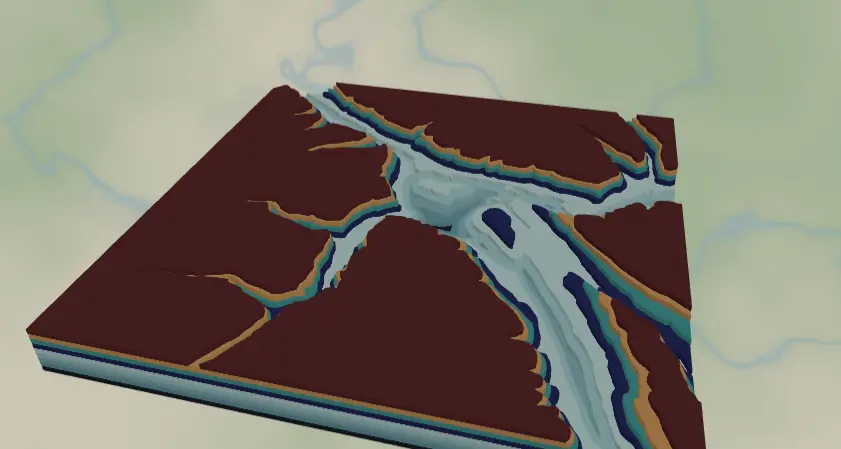
This preset combines both directions of relief in one piece: terrain contours stepping up from 1000 m to 1300 m, and river depth bands stepping down below the waterline. The result is a model where mountains rise and the river bed sinks - terrain you can run a finger through. It loads on the Columbia River valley in the Canadian Rockies.
What You'll Need
3D printing
- FDM printer; PLA - single neutral color, or multicolor via 3MF for the teal depth ramp
- 3MF-capable slicer
Laser cutting
- 9 sheets of 2–3 mm laser-grade plywood or MDF (4 terrain + 5 depth bands) plus a backplate sheet
- Optional: blue-tinted acrylic for the depth bands
- Laser cutter, glue, weights
UV print / sublimation
- High-res PNG, flat blank
Step 1 - Start from the preset
Open the Canyon River preset. It loads at zoom ~9.4 over the river valley - a wide regional window where the river carves a long ribbon through the terrain. When you move it, look for places where a big river or reservoir cuts through mountains: zoom 9–10.5 keeps both the valley walls and the water channel in frame. The terrain layers cover 1000–1300 m, so check the preview and retune elevations for your location (see Step 2).
Step 2 - Tune the layers
Top to bottom:
- Topography 1300m / 1200m / 1100m / 1000m - four terrain contours at 100 m steps. If your canyon sits at a different altitude (the Grand Canyon rim is ~2100 m), shift these values to bracket your valley walls. Empty layers should be deleted.
- River depth - a bathymetry layer with invert as holes, five bands from
bathymetryBand1(shallowest,#DDF3F1) tobathymetryBand5(deepest,#2F96B6). Each band becomes a plate with the deeper water cut out, so the river bed steps down toward the backplate. Bathymetry coverage varies by water body - if the bands look flat or missing for your river, pick a larger lake/reservoir reach nearby. - Backplate -
#1f2937dark slate, the river's deepest floor.
Step 3 - Export
- 3D printing: 3MF carries the teal depth ramp and terrain colors; STL gives a single-material model.
- Laser: per-layer SVG ZIP. Run small-polygon cleanup - regional zoom plus bathymetry produces slivers. Keep the inversion toggle on so depth bands export as stepped plates rather than water blobs.
- UV print: high-res PNG for a flat hypsometric/bathymetric poster.
Choose Your Build Method
3D printing
- Export the 3MF and open it in the slicer - terrain steps up, river bed steps down, colors assigned. With STL, a stone-gray filament plus a brushed-on blue wash in the channel afterwards looks fantastic.
- Print flat, no supports; 0.16 mm layers keep the depth steps visible.
- Scale 180 mm+ - the narrowest river band needs the width.
Make It Yours
- Strong candidates: reservoir canyons (Lake Powell!), fjords, the Columbia and Fraser valleys, big dammed rivers.
- Retune terrain bands to your altitude - e.g., 1700–2100 m for Glen Canyon, 0–400 m for fjords.
- Swap the depth ramp to warm canyon tones:
#7A3B2Edeep to#E8C9A0shallow, for a desert-sandstone read. - Cut the depth bands from successively darker blue acrylics and skip painting entirely.
- Add a Trails-style layer (
roadsPath) on top for the rim trail. - Mark the put-in and take-out of a favorite paddling run with heart icons.
- 3MF + clear PLA for the depth bands = genuinely watery river channel.
New free tools, every month.
New laser cutting tools, what's coming next, and features we're building right now. Only MyLaserTools.com news. No spam, ever.
© 2026 MyLaserTools.com. All rights reserved.