Making a beach towel or coastal print with the Beach Town Map preset
Difficulty: easy. Time: 30–45 minutes per pressed piece. Best methods, in order: sublimation (towels/totes/coasters), UV printing (acrylic/wood), 3D printed plaque. Laser engraving is the weak method here - the palette is nearly all light tones - see the note below.
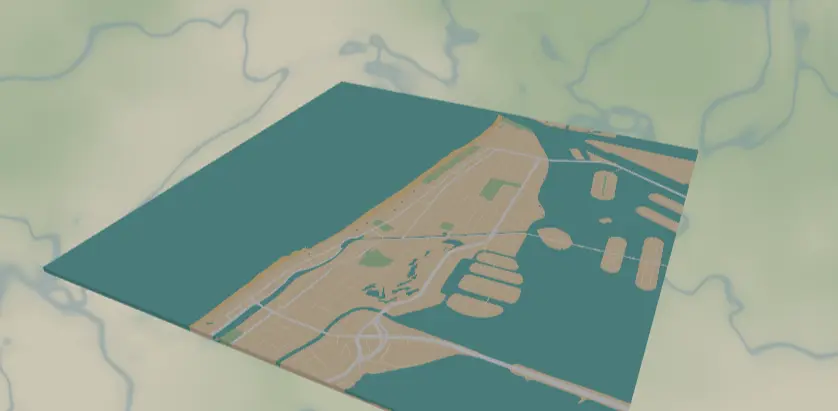
This preset is pure vacation: turquoise ocean, sandy land, pale green parks and wetlands, and sun-bleached white streets, tuned for Miami Beach but happy anywhere the water meets the sand. It's designed first for sublimation - towels, totes, and coaster sets - where the big turquoise and sand fields carry the design even when fine details soften.
What You'll Need
- Sublimation: sublimation printer + paper, polyester beach towels or microfiber towels, poly canvas totes, or poly-coated coaster/panel blanks, large-format heat press for towels (or press in sections), heat tape, butcher paper, lint roller
- UV printing: flatbed UV printer, white or clear acrylic, light wood panels
- 3D printing: multi-color printer with sand, turquoise, green, and white filaments
- Laser engraving: only with recolored roads - see the method section
Step 1 - Start from the preset
Open the Beach Town Map preset. It loads Miami Beach at zoom 13 - wide enough to get a satisfying sweep of coastline, close enough that the white street grid reads as texture. The composition rule for this preset: the shoreline is the design, so frame it diagonally or along one third of the canvas, not dead-center horizontal. Search any coastal town - Gulf Coast, Côte d'Azur, Gold Coast - and make sure a good chunk of water turquoise stays in frame; an all-land crop wastes the palette.
Step 2 - Tune the layers
One Solid layer group, Beach town:
land-#F4E2C7warm sand base.landcoverSand-#F7D9A8, the actual beaches; slightly more golden than the land so the strand line shows. Push it to#F2CD8Eif your beach isn't reading.landcoverWetland#C9E4C5andlandusePark#B9DCB2- soft greens for mangroves and parks.water-#5BC8C4turquoise, the hero fill.- Roads:
roadsMotorway#FFFFFFwidth 4,roadsPrimary#FFFFFFwidth 3,roadsSecondary#FFFFFFwidth 2,roadsStreet#FFF7EAwidth 1.
Two practical notes: the #FFF7EA width-1 streets are extremely subtle against #F4E2C7 and will mostly vanish in sublimation - that's intentional sun-bleach, but set them to #FFFFFF and width 1.5 if you want the grid to survive a towel press. And remember white in sublimation means "no ink," so white roads become the color of your blank - perfect on white towels, but on a cream tote they'll print as cream.
Step 3 - Export
- Sublimation / UV: 4096 px PNG, background ON - the sand color is the design, you almost never want it transparent here. The one exception: printing on a sand-colored or natural canvas blank where the fabric can play the land; then toggle Background off.
- 3D: 3MF export.
- Laser: per-layer SVG ZIP, and recolor first (see below).
- Enable small-polygon cleanup - coastal OSM data is full of sliver wetlands and sandbar fragments.
- For a coaster set, switch export shape to circle before exporting; corner/hanger holes generally don't suit soft goods, but Hanger hole works if you cut a beach-house ornament from acrylic.
Choose Your Build Method
UV printing
- Export the 4096 px PNG with background on.
- Size in the RIP to your panel; the flat fields and fine white grid hold up at large sizes.
- On clear acrylic, print a white underbase so the turquoise stays vivid; on white acrylic print direct.
- Register, print, and consider a matte varnish pass - gloss fights the sun-bleached look.
Sublimation
- Print mirrored at final size on sublimation paper. For a towel, that may mean tiling a large-format print.
- Lint-roll the towel, pre-press it for 5–10 seconds to drive out moisture, then tape the print face-down.
- Press with the settings recommended for your material, paper, and inks (polyester fabric typically runs cooler and shorter than hardboard).
- Peel hot and pull the paper in one motion to avoid ghosting on the fluffy surface.
- Expect the width-1
#FFF7EAstreets to disappear into the weave; the white primaries and turquoise carry the design.
Make It Yours
- Towns where the palette sings: Key West, Tulum, Santorini coastline, Cape Cod hooks, Australia's Byron Bay.
- Sunset swap: water
#7B6BC9, sand#F4C7A1, keep white roads - instant dusk-beach version. - Deep-tropic swap: water
#1FA8A0, parks#5FA86Bfor a lusher, postcard-saturated take. - Toggle water inversion in the export modal for islands so the ocean becomes the cut/printed body - great for acrylic island silhouettes.
- Add a route layer in coral
#FF6F61tracing the boardwalk or your morning beach run. - Circle export shape + Hanger hole = beach-town Christmas ornament from 3 mm white acrylic.
- Press a matching set: towel + tote + four coasters of the same shoreline, one artwork, three blanks.
- Use the heart export shape over the resort where you got engaged - same palette, instant keepsake.
New free tools, every month.
New laser cutting tools, what's coming next, and features we're building right now. Only MyLaserTools.com news. No spam, ever.
© 2026 MyLaserTools.com. All rights reserved.